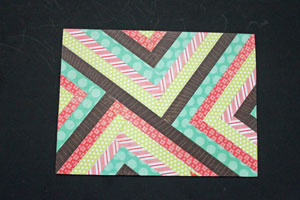
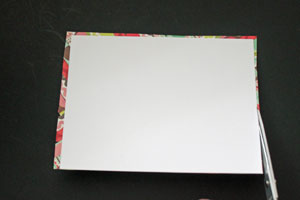
Herringbone

by Beate Johns

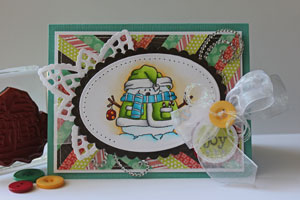
Create a unique background with thin patterned paper pieces.

Supplies
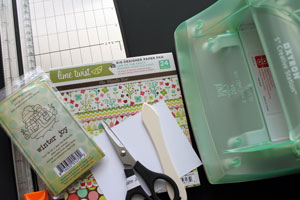
  • Patterned paper
  • Paper cutter
  • Xyron®, or other strong double-sided adhesive
  • Cardstock
  • Bone folder

Step-by-Step

  1. Step 1

    Trim a piece of cardstock to the desired size of your background. Run through Xyron® with a permanent adhesive cartridge.

    Alternative:
    If you don't have a Xyron, cover the cardstock with any strong double-sided adhesive.
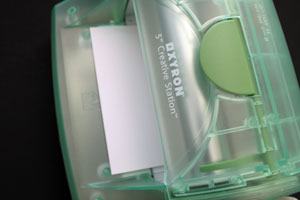
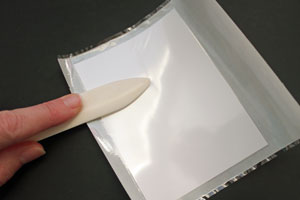
  2. Burnish the cardstock with a bone folder to make sure the adhesive sticks everywhere. Peel off backing and set aside.
  3. Step 2

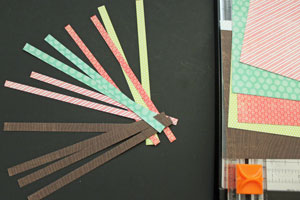
    Cut three or more different patterned paper pieces into thin strips of equal widths - the pattern looks best with widths between 1/8" and 3/8".
  4. Step 3

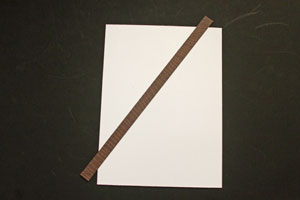
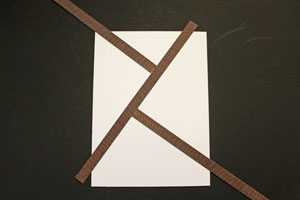
    Pick one of the darker paper strips and adhere it to the cardstock base diagonally. It will divide the cardstock piece into two triangular sections.
  5. Step 4

    Adhere another strip from the same patterned paper across one of the two sections, forming a T.
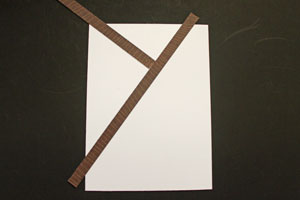
  6. Take a third strip from that paper and adhere it diagonally across the other section. You now have four triangular spaces on the card base.
  7. Step 5

    Roughly trim the paper strips. It will make the next steps a bit easier.

  8. Step 6

    Pick one section of the cardstock and start filling it in.

    Take a different patterned paper strip and adhere it next to one of the main strips.
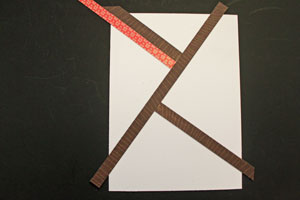
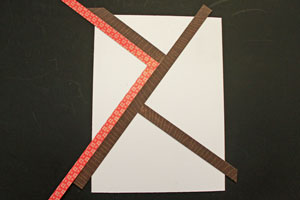
  9. Take another strip from the same pattern and adhere to the opposite side of the triangle.
  10. Step 7

    Repeat Step 6 with strips of a different paper pattern.
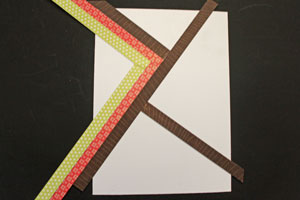
  11. Continue to add paper strip pairs until the first section is filled.
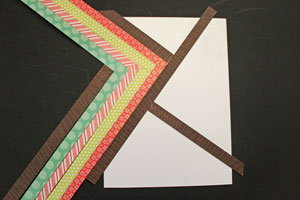
  12. Step 8

    Flip cardstock and trim paper strips. Don't trim all the way to the cardstock just yet.

  13. Step 9

    Fill in the second triangle with paper strips.
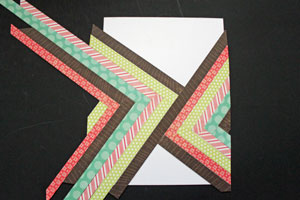
  14. Fill in the the third section.

    Trim the strips between each section. You can use the longer leftovers to fill in the next triangle.
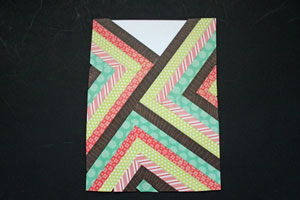
  15. Step 10

    Fill in the last section.

  16. Step 11

    Burnish the background before cutting it to the size of your cardstock. This will prevent smaller strips from falling off.
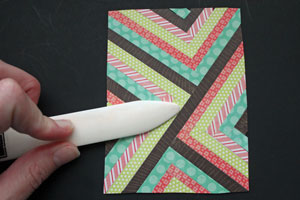
  17. Step 12

    Use the finished background on project.
    (Roly Poly Winter Joy from Unity used here)
Video!

Your Turn

You've seen the tutorial, now you try it! We've got a section of the gallery set aside for Herringbone. Try this technique, then upload your artwork to the gallery. Show us your creations!

***Please note - Internet Explorer/Edge is not a supported browser, and will not allow you to see the videos. Please use Chrome, Firefox or Safari to view our tutorial videos.

Questions and Comments

We'd love to get your feedback or questions. Leave your comment below.

holy cow!!! this is too awesome! can't wait to try it! thanks!
Michelle Bala  |  Wed Nov 30, 2011 at 5:03 AM
What a terrific background! Can't wait to try it myself. Thanks for the idea.
Laurie  |  Wed Nov 30, 2011 at 5:30 AM
What a cool technique. I LOVE that little snowman! Who makes him?
Melanie  |  Wed Nov 30, 2011 at 6:29 AM
Love this, Beate!!! Looks so cool!
Dawn Easton  |  Wed Nov 30, 2011 at 6:40 AM
My first thoughts were pastel prints as a background for Easter bunnies and Baskets. Great idea!!!
Bobbi  |  Wed Nov 30, 2011 at 7:04 AM
Another marvelous idea. Love it!! Thank you from all of us for taking the time to do these videos.
Beverly  |  Wed Nov 30, 2011 at 9:17 AM
Love it. Another fun thing to try. Keep them coming. Something different is the key to keep things fresh.
Thanks again
Ada Fry  |  Wed Nov 30, 2011 at 9:25 AM
Love it Beate - much easier than I would have expected. I'm definitely going to try this soon. THANKS!
Cindy Graham  |  Wed Nov 30, 2011 at 9:37 AM
I like it so much, I wouldn't cover it up!
Jane  |  Wed Nov 30, 2011 at 9:41 AM
Thanks Beate! I think I'll try this on some of my scrap holiday papers.
Lorie-ThePeddler  |  Wed Nov 30, 2011 at 9:44 AM
Beautiful card. Why do you cut the strips in various widths?
Dianne  |  Wed Nov 30, 2011 at 9:47 AM
Dianne,
You can cut them the same with, but it might look a bit boring or too regular, ykwim? Try it out and see if you like it the same width. There is no right or wrong here.

Hugs and smiles
beate  |  Wed Nov 30, 2011 at 10:05 AM
Jane,
Check the gallery. I made another card where I hardly covered the background up at all.
beate  |  Wed Nov 30, 2011 at 10:12 AM
good idea i have so many scrap to use thanks
marian  |  Wed Nov 30, 2011 at 10:13 AM
What a great way to use scraps! I bet it would be really nice tone-on-tone.
Tina  |  Wed Nov 30, 2011 at 10:13 AM
Beate, your card is stunning and the herringbone background is gorgeous! I love your colouring of the snowman and the way you've used the doily die as an accent. Thanks so much for the fantastic tutorial!
Emily Leiphart  |  Wed Nov 30, 2011 at 10:43 AM
Wow, Beate! What a fantastic background. Thanks so much for sharing the tutorial.
Pat (mspfd)  |  Wed Nov 30, 2011 at 10:48 AM
I do the same thing only I call it 'Faux Quilting'. To take it a step further, use your received Christmas card fronts (as they have lots of glitter and gold) for your strips...I cut into 1/8". When finished, use a die to cut a shape (deer, Christmas tree) etc. Be sure to die cut a scrap first so you can fit the piece with the die cut hole over your Faux Quilting to see the best look before die cutting your artistic work.
It's a great technique!
Jan
Janet Castle  |  Wed Nov 30, 2011 at 11:36 AM
I would love to try this technique but don't have a Zyron to create the sticky card front. Is there any other way to achieve the same result?
Tina  |  Wed Nov 30, 2011 at 12:04 PM
Oops. Hit the Z instead of the X in Xyron. Anyway--seems like double stick tape would be an incredible hassle. Any other ideas?
Tina  |  Wed Nov 30, 2011 at 12:09 PM

Page 1 of 3 pages  1 2 3 >

You need to be logged in to comment

GET OUR NEWSLETTER


Splitcoaststampers's privacy policy