Glitter Painting
by Jessie Hurley
Create a sparkly image with Glitter, stencils and double sided adhesive.
Supplies
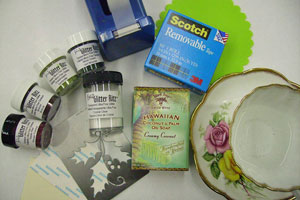
- Brass stencil, Dreamweaver Stencil used here
- Assorted glitter
- Double-sided adhesive sheet, cut down to the size of your stencil
- Neutral colored cardstock, cut down to the size of your stencil
- Removable tape for masking
- Pure coconut soap, other brand name soaps can get in the way of the glitter sticking to the adhesive sheet
- Water
- Glitter Gone Mat, or other product to clean up glitter
Step-by-Step
-
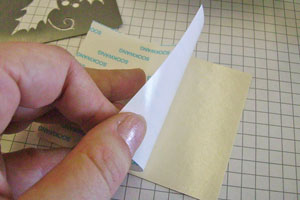
Step 1
Attach the double sided adhesive sheet to a piece of neutral colored cardstock for stability.
-
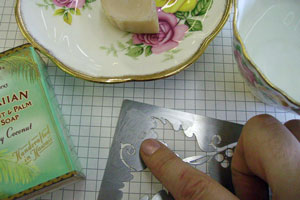
Step 2
Wet your finger with a bit of water and rub your finger into the soap creating the consistency of moisturizer. Rub your soaped finger onto the stencil.
Once your entire stencil is covered in soap, lay the soaped side down onto the adhesive sheet you prepared in Step 1.
Hint:
The soap shouldn't be too wet (lots of soapy bubbles) or too dry (hardly see the layer on the stencil) and getting to the right consistency requires some practice, but once you get it, you will always get it.
-
Step 3
Using the removable tape (or tape of your preference) mask off any areas where you do NOT want glitter to be.
As there will be 4 colors of glitter used in this example, only the branches were left unmasked in this step.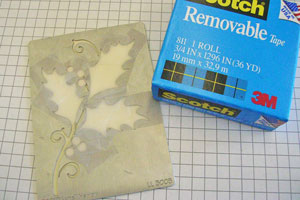
-
Step 4
Pour the first color of glitter (bronze) over your unmasked areas.
Press the glitter into your image to ensure it sticks, and tap off the excess back into the container.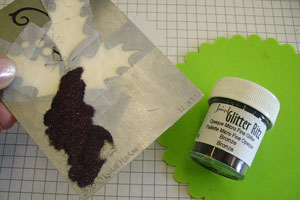
-
Step 5
Remove the tape from the areas where you would like the second color of glitter to be. In this example, the tape was removed from the berries which were then glittered with Apple Red.

-
Step 6
Remove the remaining pieces of tape.
Using your finger, dip into the third color of glitter (Moss Green in this example) and rub into the areas where you would like it to have a darker dimension.
Keep adding more glitter by rubbing it into your stencil until you have it how you like it. Keep the lines a little rougher on the inside edges, it makes it easier to blend in the color in the next step.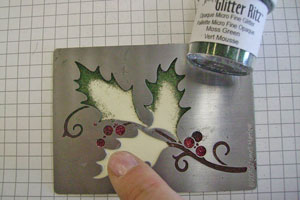
-
Step 7
Add the final color of glitter (Grasshopper)
Press the glitter into your image to ensure it sticks, and tap off the excess back into the container.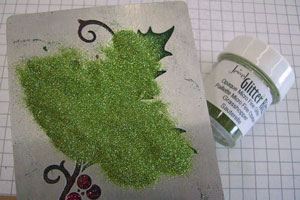
-
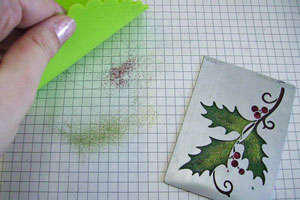
Step 8
Clean off your surface area with the Glitter Gone Mat.
-
Step 9
Lay the stencil face down on your work table and carefully peel your glittered cardstock off your stencil. If you have the right amount of soap on your stencil from Step 2, the cardstock will remove easily, if there isn't enough soap, it may fight back a little, but be patient and remove it slowly.
Hint:
It is important to remove the paper from the stencil, and not the stencil from the paper to try and ensure that your stencil does not get bent during this step.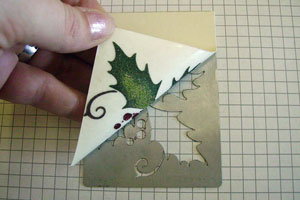
-
Step 10
Apply Clear Glitter all over the background to cover every sticky inch of the adhesive covered cardstock base.
You can use another color of glitter in this step, but because a cream cardstock was used in Step 1, the Clear Glitter allows for the color of the cardstock underneath to show through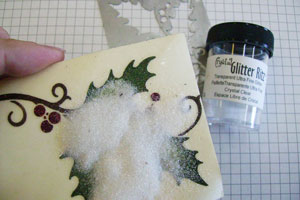
-
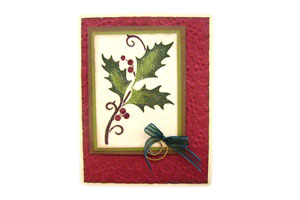
Step 11
Mat your image, and attach to a card.
Video!
Your Turn
You've seen the tutorial, now you try it! We've got a section of the gallery set aside for Glitter Painting. Try this technique, then upload your artwork to the gallery. Show us your creations!
***Please note - Internet Explorer/Edge is not a supported browser, and will not allow you to see the videos. Please use Chrome, Firefox or Safari to view our tutorial videos.

Questions and Comments
We'd love to get your feedback or questions. Leave your comment below.
I'm afraid that only a pure coconut soap or pure olive oil soap will work, with the regular soaps, there are preservatives that stick to the SookWang Tape and prevent the background glitter from sticking properly. Your background will then look funny, and after you've done all that work, you definitely want the last step to be perfect! If you can't find coconut soap where you live, we sell it on our online store at www.cherishthethought.ca
The soap is important because if you've ever tried to get something off of SookWang tape, it's nearly impossible! So to prevent your stencil from being ruined when it's removed, apply the soap to the stencil and the soap layer then allows the stencil to come off easily. However, it HAS to be pure Coconut or pure Olive Oil, as other soaps have preservatives etc that stick to the SookWang and then prevent the glitter from sticking to where the stencil was. I think this answers both of your questions at the same time, but i assure you, when you try this out, it will make more sense
i've also seen liquid soap used on the reverse of plastic masks with this technique so assume it can also be used with metal stencils.
I listed Dreamweaver as the stencil I used in the supply list, but I guess I should have listed it in the instructions as well, sorry.
A comment was made above that a plastic stencil would work, and I'm sure it would, but i like the detail that Dreamweaver stencils offer me, that plastic stencils don't.
Also, I used to just rub the soap on the stencil, but I found that the extra soap just got in my way (I don't have a soft brush i guess!) I found that once I started wetting the soap, it made teaching the technique, a lot easier, for me. I hope everyone who tries this technique will try it both ways and find what works best for them...Have Fun!
Page 1 of 3 pages 1 2 3 >