Flat Backed Treat Box

by Patti Gilliam

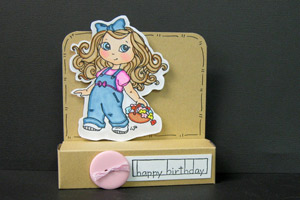
Try this fun twist on a treat box, and showcase your artwork!

Supplies
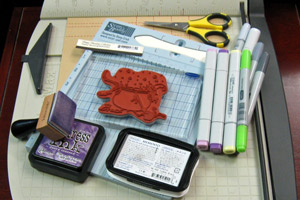
  • One 7" x 9" piece of cardstock

  • Scoring Tool

  • Strong Adhesive

  • Paper Trimmer

  • Scissors

  • Stamps

  • Ink

Step-by-Step

  1. Step 1

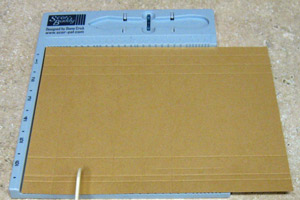
    Score the 7" x 9" cardstock on the 9" side at 1", 2", 3", 4" and 5".
    Score on the 7" side a 1/2", 3/4", 1 1/2", 5 1/2", 6 1/4" and 6 1/2".
  2. Step 2

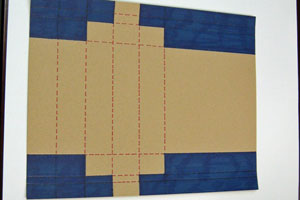
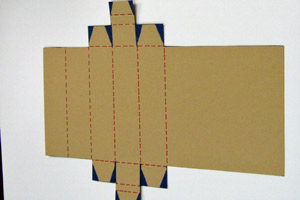
    Cut out all sections of cardstock that are shown below.
  3. Step 3

    Trim in only to the long fold lines, as shown in blue. This will create your tabs.
  4. Step 4

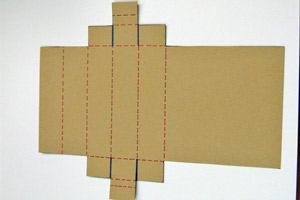
    You will want to slightly trim each tab, to ensure a nice, but snug, fit.
  5. Step 5

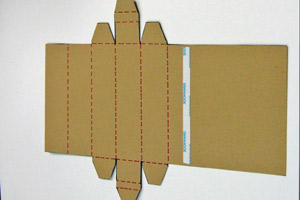
    Add strip of Scor-Tape™on the largest piece, about 3/4" from the last score line.
  6. Step 6

    Fold all score lines as shown below.

    If you are planning to stamp directly onto your box, you should do that now.
  7. Step 8

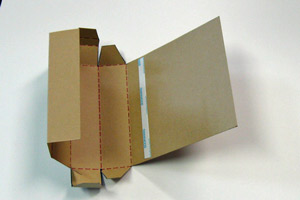
    Assemble box, by folding in each section, until they meet at the adhesive strip. Remove strip, and adhere the box body to the box ‘back’. Fold in the two short tabs on each side. Fold the long tab over the two short tabs, and score the small outside line – it should easily slip inside box for closure.
  8. Step 9

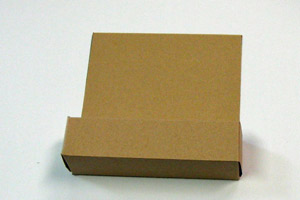
    Decorate as desired.

    This box ‘back’ is a perfect place to showcase your own artwork. It’s also perfectly sized for Hershey’s Kisses, or other small gift items.
Video!

Your Turn

You've seen the tutorial, now you try it! We've got a section of the gallery set aside for Flat Backed Treat Box. Try this technique, then upload your artwork to the gallery. Show us your creations!

***Please note - Internet Explorer/Edge is not a supported browser, and will not allow you to see the videos. Please use Chrome, Firefox or Safari to view our tutorial videos.

Questions and Comments

We'd love to get your feedback or questions. Leave your comment below.

Patti this looks terrific. I can't wait to give it a go. Thanks so much.
susie australia  |  Wed Sep 12, 2012 at 3:48 AM
WOW! This is so cool! How awesome that your talent is being showcased on Splitcoast! So proud to say that you have been my inspiration in the card making world. Love the toot and can't wait to try it.
Your friend and neighbor - Sally McD
Sally McD  |  Wed Sep 12, 2012 at 4:14 AM
Amazing project dear friend, I can always turn to you for help with my box making skills - great job and great talent. The directions are easy for even a novice boxmaker to follow.
Shirley Hotop  |  Wed Sep 12, 2012 at 6:04 AM
Oh I love this box...and great for those treats...thank you for sharing...
Gloria Westerman  |  Wed Sep 12, 2012 at 6:52 AM
I love these little boxes!! They are so cute and perfect for any little treat!! Have to give this a try!!
Peggy Packer  |  Wed Sep 12, 2012 at 6:57 AM
This is darling. I am going to be making some of these soon. I want to hand them out to the people I work with on Halloween!
Gingerbeary8  |  Wed Sep 12, 2012 at 7:52 AM
Patti you are spectacular my friend!
I am so proud of you sharing a tutorial-Great job with this one
Dawn Lotharius  |  Wed Sep 12, 2012 at 8:54 AM
Lovely !I LOVE making boxes. Perfect for Halloween handouts.Trick and treat has really taken off in my part of Spain.
Nanny Barbara  |  Wed Sep 12, 2012 at 10:54 AM
that is one of the cutest projects i have ever seen..love it and cannot wait to make some....especially Christmas themed..also a great place setting for a Thanksgiving table with the guest name on the bottom panel...ooh i am so excited to get started!
cathi cintorino  |  Wed Sep 12, 2012 at 11:04 AM
Love your tutorial, Patti! No surprise it is wonderful and she is just too too cute~!~!~ TFS
Shirley  |  Wed Sep 12, 2012 at 11:44 AM
super cute Patti!
Pam Sparks  |  Wed Sep 12, 2012 at 11:51 AM
I love this! I have already made two boxes for my husband and daughter for Halloween. Now all I have to do is decorate and fill. What a great quick project. Thank you!!
Kathleen  |  Wed Sep 12, 2012 at 12:11 PM
Yipeeeee Patti! Fabulous tutorial and project. Even I can do this---it is explained so well! Awesome job!!
Carolyn King  |  Wed Sep 12, 2012 at 1:31 PM
Great tutorial Patti. TFS your talent with us!
Beth Norman  |  Wed Sep 12, 2012 at 2:21 PM
Awesome tutorial, Patti! What a fun box!
Theresa Momber  |  Wed Sep 12, 2012 at 2:27 PM
Fantastic tutorial, Patti. I definitely will give this one a try!
Pat (mspfd)  |  Wed Sep 12, 2012 at 10:23 PM
Wonderful tutorial, Patti! ;D
Diana Queen  |  Thu Sep 13, 2012 at 8:31 AM
Oh wow!! What a gorgeous tutorial Patti!!! Brilliant work! These are such darling boxes and I can't wait to try one out!! Thank you!!
*Vicki*  |  Thu Sep 13, 2012 at 1:31 PM
this is incredible Patti, Thanks for sharing!!!
Olga Jewell  |  Thu Sep 13, 2012 at 1:49 PM
Why do we have to have the 3/4" and the 6 1/4" scores? They end up just as a crease on the closing of the box, with no purpose. Or did I put it together wrong?
Martha  |  Thu Sep 13, 2012 at 4:28 PM

Page 1 of 2 pages  1 2 >

You need to be logged in to comment

GET OUR NEWSLETTER


Splitcoaststampers's privacy policy