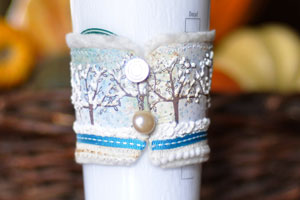
Felt Cup Sleeve

by Bev Rousch

Create a cup sleeve out of felt.

Supplies

  • Felt
  • 12" x 12" cardstock or patterned paper
  • Cup Sleeve Template, just trace one from your favorite coffee shop
  • Scissors
  • Pencil
  • Scor-Tape™, or other strong adhesive
  • Two post buttons
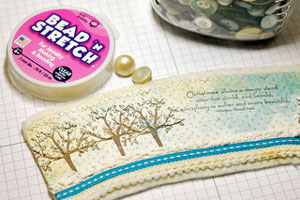
  • Elastic thread (Bead 'N Stretch™ used here)
  • Paper piercer
  • Sewing machine
  • Stamps
  • Embellishments

Step-by-Step

  1. Step 1

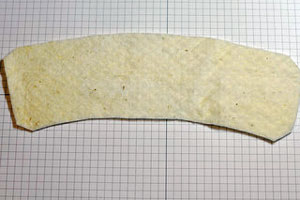
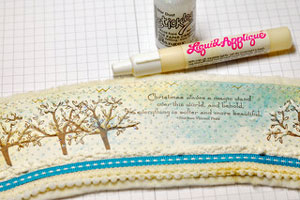
    Create a Cup Sleeve template by tracing a cup sleeve from your favorite coffee shop. Use that template to cut a cup sleeve from the piece of felt.

  2. Step 2

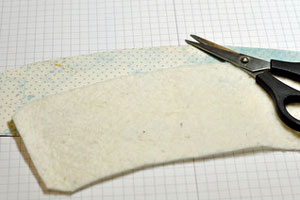
    Using the template or felt sleeve as a guide, trace a strip from the 12x12 cardstock or patterned paper to run the length of the cup sleeve.

  3. Step 3

    Use scissors to cut out the paper strip.

  4. Step 4

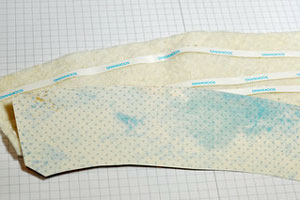
    Apply adhesive to the felt piece.

  5. Step 5

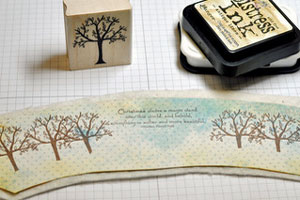
    Adhere the decorated strip of paper, choose some ribbons and sew it to the felt.

  6. Step 6

    Once sewn down, apply embellishments.

  7. Step 7

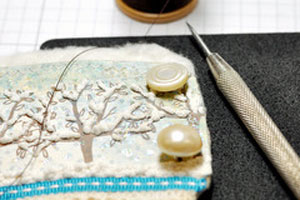
    Choose post buttons.

  8. Step 8

    Pierce holes for buttons on one side of cup sleeve and hand sew the post buttons in place.

  9. Step 9

    On the other end of the sleeve ,pierce two holes for each button, and thread elastic thread through the holes to make two loops for the post buttons. Slide loops over buttons and tie off elastic thread.

  10. Step 10

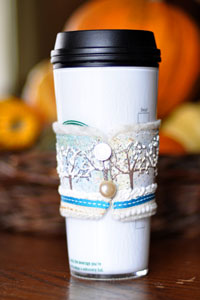
    Slide finished felt cup sleeve onto coffee cup.

Video!

Your Turn

You've seen the tutorial, now you try it! We've got a section of the gallery set aside for Felt Cup Sleeve. Try this technique, then upload your artwork to the gallery. Show us your creations!

***Please note - Internet Explorer/Edge is not a supported browser, and will not allow you to see the videos. Please use Chrome, Firefox or Safari to view our tutorial videos.

Questions and Comments

We'd love to get your feedback or questions. Leave your comment below.

Love this project. I will make a couple of these for Christmas gifts.
Elizabeth Robertson  |  Wed Dec 1, 2010 at 6:33 AM
Love it! Love it! Love it! Terrific idea for holiday gifts. Thank you for sharing. grin
Linda N  |  Wed Dec 1, 2010 at 7:22 AM
I love the design and the stamped scene is beautiful, but did you ever think of just stamping it on fabric and that way it'd last longer? I know there are inks out there especially for use on fabric and liquid applique is for fabric. That way the only thing that might not work is stickles...that probably wouldn't make it through the wash too well, but there might be a substitute for that too. Just a thought...
Tina VE  |  Wed Dec 1, 2010 at 7:58 AM
That sounds great, Tina! Can't wait to see what you make! :D
BevMom/Bev Rousch  |  Wed Dec 1, 2010 at 8:23 AM
Oh my gosh...this is THE cutest cup sleeve! I can't wait to try it! Genius! Thanks so much for sharing your creativity & tutorial!
Vina  |  Wed Dec 1, 2010 at 12:12 PM
Really, really cute design! And just in time for Christmas gifts! Thanks for sharing!
ozarkstamper  |  Wed Dec 1, 2010 at 7:09 PM
This is cute and I may make one for myself, but since people dribble and spill (especially me!), I wouldn't put alot of time into it - not washable. I guess they are considered disposable, really pretty! and a great idea.
Just thought about possibly spraying it with a fixative or maybe putting the paper part through the Xyron. that would make it last longer...... Don't mean to be mean or negative, just realistic.
stamps4funGin  |  Thu Dec 2, 2010 at 9:07 AM
stamps4funGin: That sounds like a great idea! Let me know how it works for you. smile
BevMom/Bev Rousch  |  Thu Dec 2, 2010 at 10:09 AM
These are gorgeous, thanks so much for sharing. You can stamp on fabric with Stazon and it is pretty good going through the wash. So might try these with some fabric that is stamped and stickles seem to wash ok, but easy to touch up. I have bags and book covers done this way, so a great gift.
Jen Hojem  |  Thu Dec 2, 2010 at 3:33 PM
This rocks, Bev. I have my sassy Sbux sleeve all waiting for me on my desk smile Thanks for sharing this awesome tutorial.

My family does ONLY handmade or re-gifted Christmas gifts now and it's so fun. This is so going to be one of my gifts. Hope they don't read this smile
lydia  |  Thu Dec 2, 2010 at 3:35 PM
Yes you could stamp on fabric using a fabric marker on your stamp, or tracing over the design with a micron pigmapen. Heat set with an iron and your design is washable. I loved the project! Great gift idea!
Marsha  |  Thu Dec 2, 2010 at 7:57 PM
Awesome idea!!! I can't wait ti make it!!! I can't wait to see the gallery of these babies!!!
Shelley  |  Fri Dec 3, 2010 at 8:31 AM
found a template online: http://somerandomdude.com/docs/cupsleeve/diagram_printable.pdf
Marybeth  |  Sun Dec 5, 2010 at 3:19 PM
Love this, Bev! Great tutorial!!
Amy/PickleTree  |  Sun Dec 5, 2010 at 10:54 PM
Since you have hauled out your sewing machine why not just use some great patterned cotton or flannel and sew the fabric and felt together. Choose your decorations wisely and everything could get a washing when it gets dribbled on (I am a dribbler too!). I will definately be trying this project.
Teresa Boerrichter  |  Wed Dec 8, 2010 at 2:07 PM
What a great idea for all us coffee drinker! Love it!! Thank you for sharing
2iNsPiRe*  |  Wed Dec 29, 2010 at 11:55 PM

Page 1 of 1 pages

You need to be logged in to comment

GET OUR NEWSLETTER


Splitcoaststampers's privacy policy