Double Embossing

by Beate Johns

Emboss only the outer edges of your cardstock, leaving the inner part smooth to stamp on.

Supplies

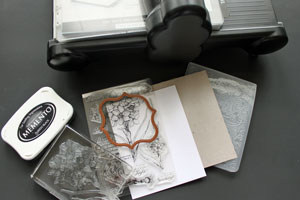
  • Big Shot™, or other die cutting machine
  • Embossing folder
  • Tan Embossing Mat
  • Nestabilities™ die template, Label 13 used here
  • One 4 1/4" x 5 1/2" piece of cardboard, for embossing frame (thin cardboard from postage stamp package used here)
  • One 4 1/4" x 5 1/2" piece of cardstock
  • Ink
  • Stamps, Flourishes Paperwhites used here
  • Additional cardstock and embellishments to finish the project

Step-by-Step

  1. Step 1

    To cut a mat from the cardboard, create the Big Shot sandwich as follows.

    Cutting mat
    Multipurpose platform on tab 2
    Cardboard
    Nestabilities die template (cutting ridges facing down)
    Cutting mat

    Hint:
    Center the die template on the cardboard.
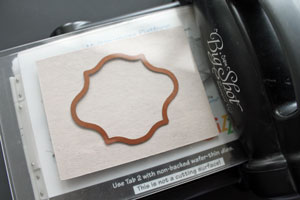
  2. Step 2

    Run sandwich through the die cut machine and pop the center out.
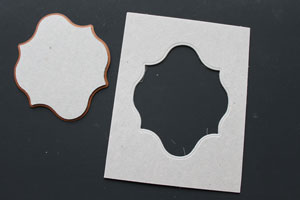
  3. Step 3

    Insert cardstock into the embossing folder. Place on closed Multi-purpose platform.

  4. Step 4

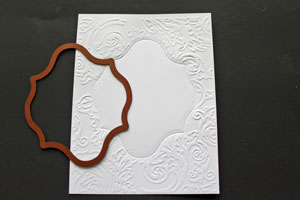
    Place cardboard frame on top of embossing folder.

    Hint:
    Add removable adhesive on the frame to make sure it doesn't move.

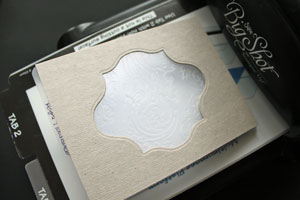
  5. Top sandwich with cutting mat.

    Trouble Shooting Hint:
    If it doesn't work, your cardboard might be too thin. Try creating two of the same masks and taping them together for one thicker mask.
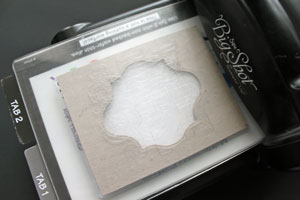
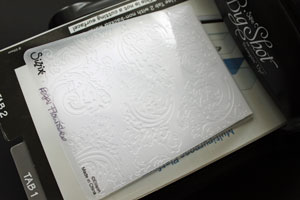
  6. Step 5

    Run sandwich through the Big Shot. Remove cardstock from the embossing folder.

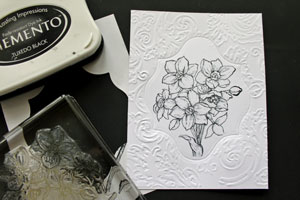
    The center of the cardstock will stay smooth.
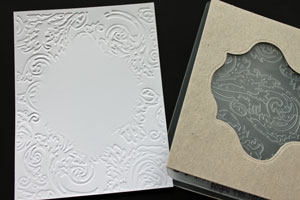
  7. Step 6

    Now create the following sandwich:

    Multi-purpose platform open at Tab 1
    Cutting Plate
    Tan embossing mat
    Cardstock
    Die, cutting side down, lined up with the smooth center of the cardstock
    Cutting plate

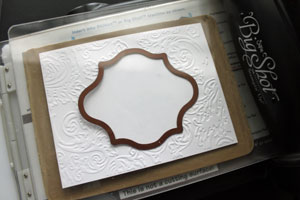
  8. Run stack through the machine, and a frame will be embossed around the smooth cardstock center.

  9. Step 7

    Stamp the image in the smooth center portion of the cardstock.

  10. Step 8

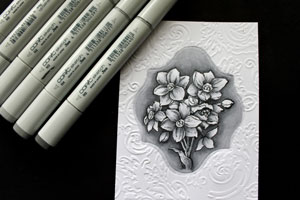
    Color and embellish the image if desired.

  11. Step 9

    Finish your card.

    Check this tutorial to find out how to create a frame with Nestabilities™ dies.
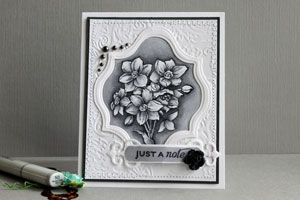
Video!

Variations

    Double Embossing with Cuttlebug™
    To cut your frame out of cardboard use the following sandwich:
    - A Plate
    - B Plate
    - Cardboard or Chipboard
    - Nestabilities die (cutting lines face down)
    - C Plate

    To emboss your cardstock use this sandwich:
    - A Plate
    - Embossing Folder with cardstock inside
    - Cardboard frame
    - C Plate

    To Emboss your cardstock with Nestabilities die use this sandwich:
    - A Plate
    - B Plate
    - Tan Embossing Mat
    - Cardstock
    - Nestabilities die (cutting lines facing down)
    - B Plate

Your Turn

You've seen the tutorial, now you try it! We've got a section of the gallery set aside for Double Embossing. Try this technique, then upload your artwork to the gallery. Show us your creations!

***Please note - Internet Explorer/Edge is not a supported browser, and will not allow you to see the videos. Please use Chrome, Firefox or Safari to view our tutorial videos.

Questions and Comments

We'd love to get your feedback or questions. Leave your comment below.

A LSS in my area makes something called "chippies" - cardboard pieces with empty areas (square, circle, rectangle) and I bought them and realized I could make my own. I used sizzix dies and creative memories shapes (yes, I could cut the chipboard backers from paper packs) but haven't tried nesties. Now I will. I've seen very pretty cards with embossing and unique shapes and now I think I can do it myself. Thanks Beate!
Lynn Lehrman  |  Thu Feb 10, 2011 at 12:32 PM
WOW... this is a super cool techniques... and that card is STUNNING!!!
colleen schaan  |  Wed Mar 2, 2011 at 6:20 AM
This is a really great idea!
Double embossing has endless possiblities!!!! Thanks so much for the excellent video tutorial!!!!!!
Kris  |  Wed Mar 2, 2011 at 6:34 AM
Beate, great job...I own a Cuddlebug and have never really seen or used a BIG SHOT...so this was a double lesson for me!

Thanks!
Susanne  |  Wed Mar 2, 2011 at 6:45 AM
What an amazing card! The tutorial is great, everywhere I find tutorials with Cuttlebug, it's so great that you did show it with Big Shot (what I have). Thank you so much. All your tutorials are such help. When I see your name I know I am going to like it!
Liv  |  Wed Mar 2, 2011 at 7:02 AM
THANK YOU so much! I was wondering how this was done! Can't wait to try it!
Lucy  |  Wed Mar 2, 2011 at 7:04 AM
Thanks for the tutorial, a lightbulb just lite up in my head. Great job and love those flowers
Karleen  |  Wed Mar 2, 2011 at 7:17 AM
Great tutorial Beate! One question...it looks like your finished card has an additional, separate frame around the image section, that would have been cut out afterward and adhered on top. Or what did you do to get it so much more pronounced?
Thanks!
Linda
Linda  |  Wed Mar 2, 2011 at 7:17 AM
Linda,
I cut a frame with the die I used plus the next size up frame out of white cardstock and adhered it over the image.
beate  |  Wed Mar 2, 2011 at 7:18 AM
You make this look so easy, Beate! Thanks for the incredible technique and tutorial.
Charlene  |  Wed Mar 2, 2011 at 7:20 AM
Thank you for the tutorial. I've always wondered how this was done. Your card is beautiful.
Kathy  |  Wed Mar 2, 2011 at 7:20 AM
This is probably a silly question, but, when you are embossing with the nestabilitie, is the embossed side of the card stock face up? And secondly is the nestabilitie placed with the cutting edge down are up? I have ruined so many tan embossing mats. Thank you so much for the help for this card as well as all of your tutorials. Have a great day!
Konnie  |  Wed Mar 2, 2011 at 7:27 AM
Hi Konnie,

It is really up to you if you want your embossed part up and down when you use the Nestabilities to emboss the frame.

As stated in step 6 you place the tan mat, then the paper, then the die with the cutting lines facing down towards the paper and the mat.

Hugs and smiles
Beate
beate  |  Wed Mar 2, 2011 at 7:36 AM
Oh, my, this is beautiful and I love the technique.

We've missed you the past several weeks...welcome back.
Jan D.  |  Wed Mar 2, 2011 at 7:38 AM
Oh wow!!!! The card is absolutely stunning!!!! Thank you so much for this tutorial. I had seen the center un-embossed before and this tutorial is great!! Can't wait to try it:)
SandyC.  |  Wed Mar 2, 2011 at 7:58 AM
Beate, your tutorials are always THE BEST, and this one is fabulous!!! What a stunning card!!!!!
Lorie  |  Wed Mar 2, 2011 at 8:04 AM
Your talent is just amazing! What a beautiful card and in black and white, too. Who would have thought?! YOU!
Di.  |  Wed Mar 2, 2011 at 8:18 AM
This is a fantastic video with amazing results. Thanks so much for showing us how to do it!
Emily Leiphart  |  Wed Mar 2, 2011 at 8:39 AM
If you are going to place the frame over it is it necessary to emboss the second time, I was just wondering since you are covering up that area or does it add that much dimension that it is necessary?
Bethany  |  Wed Mar 2, 2011 at 8:49 AM
Beate you're so amazing, and always so helpful to us <3
vickie maduzia  |  Wed Mar 2, 2011 at 8:57 AM

Page 1 of 7 pages  1 2 3 >  Last »

You need to be logged in to comment

GET OUR NEWSLETTER


Splitcoaststampers's privacy policy