Die Cut Stamps

by Alma de la Rosa

Create stamps out of die cuts.

Supplies

  • Dies, Cat's Pajamas Flower Buttons, Sunflower Rosette, Lacey Butterfly used here

  • Die Cut Machine

  • Fun Foam

  • Ink, Marvy Pink, Rose Pink, Orange, Yellow, Bubble Gum. Versafine Spanish Moss used here

  • Glue Stick

  • Stamps, Cat's Pajamas Words of Love used here used here

Step-by-Step

  1. Step 1

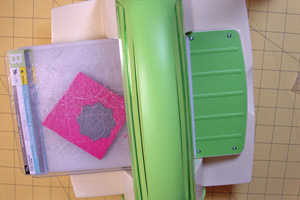
    Place your die on fun foam and run through the die cut machine.

  2. Step 2

    Use gluestick to attach the die-cut shape to an acrylic block. This is for a temporary stamp.

    For a permanent stamp run the die-cut through a Xyron machine and attach to a wood mount.
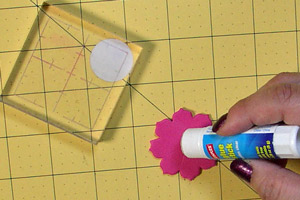
  3. Step 3

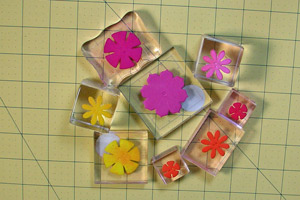
    Continue cutting foam shapes and adhering to blocks until you have and assortment of different shapes.

  4. Step 4

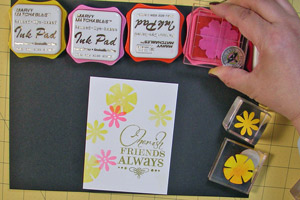
    Use various different inks to stamp the flowers cardstock.

  5. Step 5

    Finish your card.

Video!

Your Turn

You've seen the tutorial, now you try it! We've got a section of the gallery set aside for Die Cut Stamps. Try this technique, then upload your artwork to the gallery. Show us your creations!

***Please note - Internet Explorer/Edge is not a supported browser, and will not allow you to see the videos. Please use Chrome, Firefox or Safari to view our tutorial videos.

Questions and Comments

We'd love to get your feedback or questions. Leave your comment below.

Hi Alma! Pretty, cheerful card. Thanks for making a nice video to share instructions on how you make your fun foam stamps from Cut-Ups. I have been using fun foam to make stamps from my dies for years. If I may, I would like to share a few things I've learned. First, to make them cling mount, I apply two or three coats of Alene's Tacky Over and Over glue on the backs. It is kind of messy so I use disposable, foam brushes, which often go on sale at my local craft store 10 for $1. I let the glue thoroughly dry, then store in plastic cases. If/when the glue becomes less tacky, I just add another coat or two of the glue. If I want to cut and use them right away, I use two-sided, temporary tape, such as Scotch brand. To clean my foam stamps, I stamp them off on scratch paper, then mist them with water and wipe with a "stamp" rag. (I have a stash of stamp rags which I specifically use to only clean my stamps.) It's great to expand your stamp collection with die-cut fun foam stamps. Another good thing, is that I can buy 20 thin foam sheets (which I prefer to thicker foam) for just $1 at my local $1 store. It's economical to cut duplicates, if need be. (Like, for example, if one absorbs so much ink that you can't get clean all of the ink off, which sometimes happens, especially w/dark or bright colors.) Thanks for the video and letting me share my thoughts. Happy stamping to all. smile
Gabby  |  Wed May 8, 2013 at 3:23 AM
You mentioned several times "my favorite glue stick", can you enlighten us as to which glue stick that is.
What thickness of Fun Foam? Thanks
Julie Njus  |  Wed May 8, 2013 at 4:59 AM
I love getting my Splitcoast Stampers e-mails. The fun ideas and creativity are great.
Paula Spadaccini  |  Wed May 8, 2013 at 5:40 AM
Thank you for this WONDERFUL tutorial. What a great way to use those favorite dies! THank you Gabby too, for your insight and for sharing the finishing touches tips!
prissequito  |  Wed May 8, 2013 at 7:13 AM
Oh my gosh! This is genius! I am a little slow, it took me a minute to figure out what was being made but WOW!!!! How fun is this!!!!
angela bode  |  Wed May 8, 2013 at 8:39 AM
Love this card and making stamps from dies is a great idea. The colors are so "springy" and cheerful. Will make a bunch of cards for all occasion uses! Thanks.
Mamam  |  Wed May 8, 2013 at 8:49 AM
What a fabulous idea. Thanks for sharing. It makes the cost of the dies a little less daunting if you can use them to stamp backgrounds too. Can't wait to try it.
Alison Green  |  Wed May 8, 2013 at 9:12 AM
Julie, my favorite glue stick is any glue stick. I prefer glue stick as my choice of adhesive because it gives me a bit of wiggle room, and if I change my mind about the paper I used, I can remove it easier than if I used 2 sided tape
[email protected]  |  Wed May 8, 2013 at 11:44 AM
Brilliant segment ! Also fun is to die cut your shape for a card and die cut it again out of foam. Stamp it with the foam one using a pale gray ink in the desired spot or spots on the card. Then affix the first die cut just slightly askew of the gray stamped image. Makes a wonderful "shadow" and ads lots of depth to your images.
Thanks for starting this thread ! ! ! Wonderful fun !
Cheryl Faxon  |  Wed May 8, 2013 at 2:23 PM
ALMA - I will have to experiment w/different glue sticks. The one I tried (I think it was Elmer's) didn't hold the fun foam die cut in place so it slid around, ending up not giving me solid, clear images. I had better luck with the two-sided, removable tape. BTW, do you have any suggestions on cleaning them? THANKS again for bringing this great technique to light, to so many. You're a sweetie! smile

Cheryl, the "shadow" stamping is a COOL idea and I will definitely be trying that out! TF the idea.

Cheryl's comment caused me to to remember four more things that I didn't share in my original reply. First, the kissing technique works great on fun foam stamps. Their solid surface really takes on the kissed stamp image. (i.e. add script to a flower foam cut and stamp.) Second, is that sometimes I cut a die from whatever medium I'm going to use and then I cut a thin fun foam of the same, attach them and add it to my project. It is much more economical than using lots of foam tape or dimensionals to raise up the image. Third, once, when I ran out of dimensionals, I die cut small fun foam circles to use in place of them. I attached them w/Tombo all-purpose glue or Scor-Tape. They work great tucked inbetween layered flowers. Fourth and lastly, since the thin fun foam comes in many colors, I have die cut and used the shapes directly on a card and/or art journal page. Okay that's it.

I HOPE EVERYBODY WHO HAS DONE THIS, OR WILL BE INSPIRED FROM ALMA'S VIDEO TO TRY IT, WILL SHARE WHAT FUN THINGS THEY DO WITH IT! I'd love to learn new ways to use it. :D
Gabby  |  Thu May 9, 2013 at 6:20 AM
This is so pretty and just shows there is no limit to how creative you can be with your supplies and gadgets. Can't wait to try it.
Gail  |  Thu May 9, 2013 at 12:04 PM
Gabby, Thank You for sharing all your tips! I especially love using the foam to boost your shape. It's a great idea when mailing a card. Your shape won't get "squished" and will remain boosted. And, it's light enough not to add additional weight.

I use a variety of different glue sticks. The one in the video is from Staples. I got them on sale and they work pretty well. I just have to make sure that enough is used.

As far as cleaning them, I use baby wipes. I've only used the foam with pigment and dye ink as I'm afraid that a solvent based ink will eat the foam.

I'm so excited to try the kissing technique!
Alma de la Rosa  |  Thu May 9, 2013 at 1:06 PM
Alma thank you for a great tutorial, I have heaps of dies that would make fantastic stamps!!! Thank you Gabby and Cheryl for your great ideas too. I use window frame and fence dies a lot with my cards, I can't wait to cut foam dies and use them instead of 3D foam tape. I know what I'll be doing this weekend. TFS
Susie Williams  |  Fri May 10, 2013 at 3:31 AM
Can you cut fun foam with framelits?
Roberta  |  Fri May 10, 2013 at 1:18 PM
Hi Roberta I purchased some inexpensive foam sheet this morning and I have been cutting away for a few hours. I don't have framelits dies, but I have very successfully cut Cuttlebug dies, Cottage Cutz, MFT die-namics, Poppystamps and MemoryBox dies and some other very thin metal dies that I have forgotten the brand.

I am using a Vagabond with the Sizzix Solo Thin Die Adapter and running it through twice (some dies have needed 3 passes through the machine).

I used Bostik Glue stick and was surprised how well the foam stayed on an acrylic block for stamping, I then removed and wiped the block and foam with a baby wipe. Too easy.

I am going to combine all the suggestions by Alma, Gabby and Cheryl. Make a stamp from tree die, stamp a grey shadow and then use the same foam cutout and cover with dp for a 3D tree. I thought about experimenting and paint the foam fence instead of covering with dp.

Thanks again Alma for this brilliant technique.
Susie Williams  |  Fri May 10, 2013 at 10:21 PM
Oh, Susie ... what a great idea to paint the foam! One disadvantage of the cheap pkgs of thin foam is that they are usually very bright colors. When I have used them as backing to create dimension, all around the edges, I use the same or similar colored marker to cover up the foam color. And if I don't have the same or a similar colored marker, I use a black Sharpie. But ... PAINT you say ... hmmm. Please do let all of us know how that goes, won't you!?! I'll look forward to seeing your project in the Die Cut Stamps gallery. Gabby smile
Gabby  |  Fri May 10, 2013 at 10:57 PM
Paint worked a treat. I had an old tube of dark brown acrylic paint and painted it over hot pink foam. It completely covered the pink but the finish didn't look very dark brown, but still very effective.

My next experiment was best of all. I inked up the foam with Brilliance black, made several stamped images, then reinked it and let it dry and then painted it with the dark brown acrylic paint. Perfect!! I always upload a card for Teapot Tuesday so no matter what the theme is I will use this stamping and painting technique!!
Susie Williams  |  Sat May 11, 2013 at 3:40 AM
WHAT A SUPER IDEA!!!!!!!! THANKS FOR SHOWING US!!!!!!:)
Becky Green  |  Wed May 15, 2013 at 10:56 AM
Hello Alma
Thank you for the great tutorial
Here is my card :
http://www.splitcoaststampers.com/gallery/photo/2371001?&cat=500&ppuser=205884
greetings from Belgium,
Monique ( niki1 )
niki1  |  Wed May 15, 2013 at 1:01 PM
Nice Card,
I am going to pickup some fun foam and get out my die cuts so I can add to my stamps.

This was very helpful, Thank you
Linda B  |  Thu May 16, 2013 at 11:49 AM

Page 1 of 2 pages  1 2 >

You need to be logged in to comment

GET OUR NEWSLETTER


Splitcoaststampers's privacy policy