Coloring Hair

by Elizabeth Whisson

Learn tips for coloring hair with depth and detail, using principles that can be applied to any coloring medium.

Supplies

  • Smooth cardstock (X-Press It blending card used here)

  • Printed digital stamp or rubber stamp image stamped with dye ink (Whimsy Stamps digital stamp used here)

  • At least 3 markers – light, medium and dark (four Copic alcohol markers used here)

  • Other supplies as needed to complete the project (stamps, cardstock, trim, adhesive)


Step-by-Step

  1. Step 1

    Print or stamp a line image onto smooth cardstock. Use a dye ink for stamping any image you are going to color with alcohol markers. Memento brand is recommended.

  2. Step 2 (Optional)

    Print or stamp the image again onto another piece of cardstock – this image will be used for determining shadow placement.

    Choose a dark marker and mark all the places where the shadows will be in the hair. This will be areas near the crown and tips of the hair, and anywhere the hair is behind another piece of hair or other object (cast shadows). Hair is also darkest (deepest shadows) where it bunches together, like in a ponytail or plait.

    You may then wish to take a light colored marker and mark in the highlight areas. This image can then be used as a shadow guide.
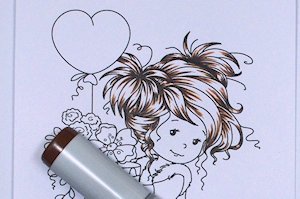
  3. Step 3

    If only using one image, or after determining shades/highlights on the sample image:
    Take one of the lightest colored markers (E21 used here). Using the tip of the marker, flick out the color from all the shadow areas towards the highlight area. Don’t go too far into the highlight area. Add any cast shadows. This is now your guide for adding the shadows in the next step.

  4. Step 4

    Take your darkest marker (E49 used here) and, using the optional image or the strokes made with the lightest colored marker in the previous step as a guide, flick the color from the shadow area towards the highlight area. Hold the marker upright and use only the tip to achieve finer strokes. Leave small gaps between your strokes but ensure each stroke originates from the shadow area. Follow the curve of the hair or artist drawn lines.

  5. Step 5

    Take the next lightest marker (E25 used here) and flick the color from the shadow area towards the highlight area but go a little further into the highlight area, past the end of the darkest color that you added in the previous step. Generally follow the flicks already made with the darkest marker, but you can add some extra flicks too.

  6. Step 6

    Take the next lightest marker (E21 used here) and continue as for the previous markers, flicking the color further still into the highlight area. You will notice some white sections were left all the way into the shadow area. This breaks up the shadows a little so it is not all one block of color.

  7. Step 7

    Take the lightest marker (YR31 used here) and fill in the rest of the white area. Do not blend the colors but continue to flick the color in as before.

    HINT:

    If you prefer you can leave small amounts of white space for highlights to add contrast.
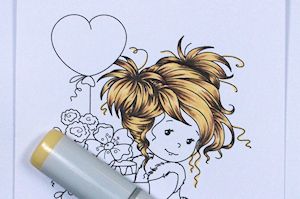
  8. Step 8

    Because you’ve been flicking lighter colors over darker colors, the dark colors can become lighter. Repeat steps 3 to 6 to deepen the shadows.

    NOTE:
    You don’t need to add as much color the second time around – ensure not to lighten the dark colors again. When repeating Steps 3 to 6, you don’t have to follow the exact flicks you did before.

  9. Step 9

    Finish coloring your image and add it to a card or project.

    HINT:
    When coloring people it is best to start by coloring the skin, as skin is usually a lighter color than the hair. Coloring the skin after the hair can cause the darker hair colors to bleed into the skin area during coloring.

Video!

Variations

  1. Instead of alcohol markers, use another coloring medium, such as paint or pencils.

Your Turn

You've seen the tutorial, now you try it! We've got a section of the gallery set aside for Coloring Hair. Try this technique, then upload your artwork to the gallery. Show us your creations!

***Please note - Internet Explorer/Edge is not a supported browser, and will not allow you to see the videos. Please use Chrome, Firefox or Safari to view our tutorial videos.

Questions and Comments

We'd love to get your feedback or questions. Leave your comment below.

Thank you for this tutorial. Your coloring is beautiful.
Edie  |  Wed Jun 24, 2015 at 2:54 AM
I want her hair, Elizabeth! Thank you for your wonderful instructions. I very much like your idea of stamping a second image to identify where the shadows and highlights are. Thanks, too, for the reminder you can also color with pencils. I look forward to seeing more of your tutorials.
Kab  |  Wed Jun 24, 2015 at 3:48 AM
Very good tutorial!! Lots of super tips, especially for people like me who are only now venturing into colouring images. Thanks so much
Sheryl Venter  |  Wed Jun 24, 2015 at 4:18 AM
Great technique. Thanks for the good video on achieving these results, and the tip on using the second image as a mapping print. I could cut down on a lot of mistakes if I mapped the shadows and highlights first.
Janet Ashley  |  Wed Jun 24, 2015 at 6:17 AM
Thanks for the excellent tutorial and video. I just ordered alcohol markers and now can't wait to play with them!
Kathy Asper  |  Wed Jun 24, 2015 at 6:28 AM
Thank you for all your lovely comments - so glad you like the tutorial!
Elizabeth Whisson  |  Wed Jun 24, 2015 at 6:49 AM
Elizabeth, this is a wonderful tutorial. This is the technique I learned in my Copic courses. It's also a good technique to use when learning where the light source is on your piece. Thank you for taking the time to put this together for us. Two thumbs up and an A+!
Susie Lessard  |  Wed Jun 24, 2015 at 6:56 AM
Great tutorial! Which Copics (#s) did you use? I struggle to figure out the best combinations.

Thank you again.
Patty Turski  |  Wed Jun 24, 2015 at 7:10 AM
Hi Patty, For the hair I used E49, E25, E21 and YR31 (darkest to lightest). The copic marker #'s I used on the rest of the image are available on my blog - see "site" link under "the author" at the top of this page or follow the link in the description for my card in the coloring hair gallery (link to the gallery is at the end of the tutorial under "your turn"). I hope that answers your question.
Elizabeth Whisson  |  Wed Jun 24, 2015 at 7:31 AM
Thanks for putting together a wonderful, detailed tutorial; this is very helpful!
claudia zimmerman  |  Wed Jun 24, 2015 at 7:38 AM
Thank you, Elizabeth! This is a fantastic tutorial! I will try the combination you used.
Patty Turski  |  Wed Jun 24, 2015 at 8:11 AM
Elizabeth, thanks you for sharing. I am a horrible colorer. Everything ends up looking muddy. I'm going to try your technique. I make no promises, but I'm hopeful for a successful result. I do have one question. How long did it actually take you to complete the hair? The video is 16 minutes long and you did a lot of "speed coloring". Do you use the same technique for coloring the clothing and such? I really feel like a dummy here.
Juanita  |  Wed Jun 24, 2015 at 1:04 PM
Oh, Elizabeth, what a wonderful tutorial, and congratulations on your first tutorial for SCS! Yay! I love your coloring, and it's good to hear your sweet voice. You did another video that was linked to your blog recently, and I loved it! Thank you so much...and hugs, sweet friend!
CherylQuilts  |  Wed Jun 24, 2015 at 1:12 PM
I cannot speak for Elizabeth but I can spend at least 20 min on complex hairdos like this one. Sometimes up to 30 min. Over an hour for a total image like this.
Rebecca Ednie  |  Wed Jun 24, 2015 at 4:14 PM
Hi Juanita, the hair took me about 40 mins to complete and the whole image was around 2.5 hours (including the background) (and this is a smallish image at approximately 10 cm high). If I coloured in a hurry (instead of being really careful, like I was here) I could've coloured the image in 1 - 1.5 hours. When I first started, something like this easily took me up to 8 hours or more (and I would've coloured it over a few days instead of in one sitting). Backgrounds, depending how complicated they are, can sometimes take an hour or more in themselves too. People obviously colour at different speeds (and you do get quicker with practice). I may be slower than average, I'm not sure, but I love colouring, so it doesn't bother me grin On my you tube channel (link from my blog site) there is a speed colouring video of a lantern picture - that one took me an hour to actually colour and I would say it isn't as complicated as these images here.
Elizabeth Whisson  |  Wed Jun 24, 2015 at 4:48 PM
Sorry Juanita, realised I only answered one of your questions! The whole image uses quite a few different colouring techniques. The hair is the only part of the image coloured as described in the tutorial - most of the rest of the image is coloured using blending techniques (the hair is not blended).
Elizabeth Whisson  |  Wed Jun 24, 2015 at 5:03 PM
Thanks for the wonderful tutorial, Elizabeth. I've actually been practicing on hair coloring for a while, and I appreciated your tips. Your card is beautiful!
Lois Bak  |  Wed Jun 24, 2015 at 6:05 PM
A wonderful tutorial, as always. I have tried things I never dreamed of trying after watching you try it. Thanks for the inspiration Lydia.
Mary Kay
Mary Kay Miller  |  Wed Jun 24, 2015 at 6:36 PM
Thanks so much for the very detailed tutorial on coloring hair ... it gives me a lot more confidence to try it. I've always wanted my images to look more professional and this technique will definitely help ... with a LOT of practice, of course! LOL
Susan  |  Thu Jun 25, 2015 at 10:43 AM
That was awesome! I can't imagine myself getting that very professional look but I'll have to try it! Thanks!
Sue Neuharth  |  Thu Jun 25, 2015 at 11:02 AM

Page 1 of 2 pages  1 2 >

You need to be logged in to comment

GET OUR NEWSLETTER


Splitcoaststampers's privacy policy