Colored Texture Paste

by Deb Valder

Match texture paste to any project using reinkers.

Supplies

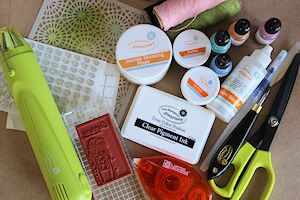
  • Cardstock (Fun Stampers Journey (FSJ) Whip Cream and Black Licorice used here)
  • Texture paste (embossing paste, modeling or molding paste - FSJ brand used here)
  • Stencil (FSJ Starburst Lines used here)
  • Palette knife (FSJ Spatula used here)
  • Reinkers to color the paste and stamped image (FSJ colors used here)
  • Glitter (FSJ Sparkle Dust used here)
  • Other supplies as needed to complete the project (FSJ products used here: Capture The Moment Stamp Set, Clear Pigment Ink, Black embossing powder, Heat Tool, Medium Foam Squares, Medium Blending Brush, Blending Fusion, thread in various colors - Bubble Gum, Lemon Grass and Black Licorice, Sparkle Drops)

Step-by-Step

  1. Step 1

    To customize texture paste to your project, you can add in a pigmented medium, such as paint or reinkers.

    For each desired color, put a small amount of paste on a palette (any nonporous surface will do – an acrylic block is used here).

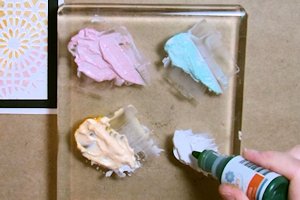
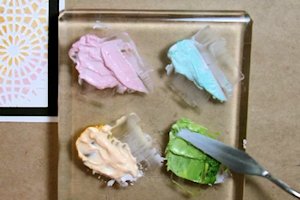
  2. Add ink until the desired color is reached (1-3 drops, depending on the strength of the color). Mix well with a palette knife.

  3. Step 2

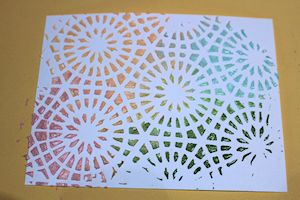
    Prepare a card base. Lay a stencil over the panel.

    Starting with the first color, pick up a little colored paste with a palette knife and spread it over the stencil, making sure it is smooth and there are no ridges anywhere.

    Clean the palette knife between colors, and continue adding colors as above until the background is complete.

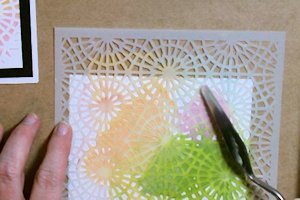
  4. Gently lift the stencil away to reveal the raised pattern.

  5. Step 3

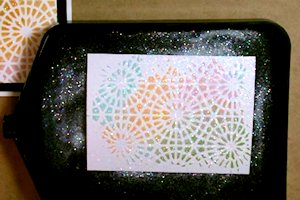
    Sprinkle glitter over the texture paste while it is still wet. Set the panel aside to dry.

  6. Step 4

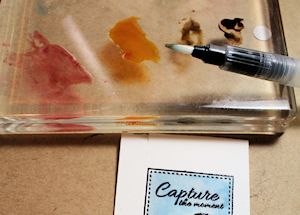
    While the panel is drying, prepare the other elements of the card.

  7. TIP:
    Use coordinating inkpads or the same reinkers as above on the stamped image so that all card elements tie together.
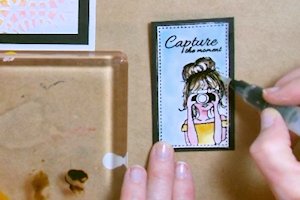
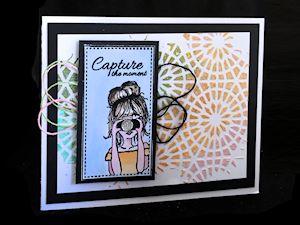
  8. Step 5

    Assemble and complete the project.

Video!

Your Turn

You've seen the tutorial, now you try it! We've got a section of the gallery set aside for Colored Texture Paste. Try this technique, then upload your artwork to the gallery. Show us your creations!

***Please note - Internet Explorer/Edge is not a supported browser, and will not allow you to see the videos. Please use Chrome, Firefox or Safari to view our tutorial videos.

Questions and Comments

We'd love to get your feedback or questions. Leave your comment below.

Fabulous tutorial, thank you
Mandy Stacey  |  Wed Mar 9, 2016 at 3:56 AM
Great Tutorial Deb -- thanks for all the tips! Candee P
Candee Porter  |  Wed Mar 9, 2016 at 5:04 AM
Thank you so much for the terrific tutorial and all the great tips Deb. I love your finished card too. Can't wait to play!!
Susie Williams  |  Wed Mar 9, 2016 at 5:44 AM
What is Blending Fusion? I looked to see and can't find it. Can you give a link?
Kathy Stacy  |  Wed Mar 9, 2016 at 6:17 AM
Awesome fun! I finished my modeling paste stencils and when they dry, I will finish my card! Thanks for the tutorial.
muscrat  |  Wed Mar 9, 2016 at 6:45 AM
Thank you! Wonderful tutorial. I am going to do this! Thank you for the tips!
Sharon Madson  |  Wed Mar 9, 2016 at 8:13 AM
Absolutely BEAUTIFUL card that I now plan to make, however, I need to ask two questions:

(1) Can I use Matte Modeling Paste?

(2) Are those re-inkers alcohol based or water based?
Delphine Baker  |  Wed Mar 9, 2016 at 8:47 AM
Thank you so much Mandy for your sweet comment. I'm glad you liked it. Give it a try, it's so easy.
Deb Valder  |  Wed Mar 9, 2016 at 11:34 AM
Thank you so much Candee! I'm so glad you liked it! smile
Deb Valder  |  Wed Mar 9, 2016 at 11:38 AM
Thank you Susie! Let me know how you make out when you play! :0)
Deb Valder  |  Wed Mar 9, 2016 at 11:39 AM
Hi Kathy, Here is the link to the Fusion Blender!
https://shop.funstampersjourney.com/MemberToolsDotNet/shoppingcartv3/ProductDetail.aspx?ProductID=20150&CatalogueID=212&PartyID;=&PartyGuestID;=

Let me know if you have any questions.
Deb Valder  |  Wed Mar 9, 2016 at 11:42 AM
Thank you so much Muscrat! I hope you like it as much as I do! Let me know if you have any questions.
Deb Valder  |  Wed Mar 9, 2016 at 11:43 AM
thank you Sharon for your lovely reply. If you have any questions when you do this, let me know. It is so much prettier in person! Good luck.
Deb Valder  |  Wed Mar 9, 2016 at 11:46 AM
Hi Delphine, Yes on the Matte Paste.
Deb Valder  |  Wed Mar 9, 2016 at 11:48 AM
I absolutely LOVE your gorgeous card and technique!!! Where can I find the cute image?
Lori Aragon  |  Wed Mar 9, 2016 at 2:21 PM
Delphine, I used dye reinkers on my gallery sample and they worked just fine.
Dina  |  Wed Mar 9, 2016 at 7:56 PM
Lori, the stamp set is listed in the supply list at the top of the tutorial page.
Dina  |  Wed Mar 9, 2016 at 7:58 PM
I am having trouble getting the photos to load in the tutorial. I have tried IE, Chrome and Firefox browsers.
Wanted to print it out. I've been printing the weekly tutorials for a really long time. Great resource!
Loretta Rathert  |  Thu Mar 10, 2016 at 5:04 PM
I love using texture paste. I have done this a long time ago but never kept it up but the local stamping show demonstrated this last Nov. so I went out and bought templates. The craft store had some cards on display using this method. I would love to have or join a swap using texture paste. Anyone interested?
Mary Joyce  |  Sat Mar 12, 2016 at 8:13 AM
Such a cool technique! Beautiful card!
angela bode  |  Mon Mar 14, 2016 at 8:24 AM

Page 1 of 1 pages

You need to be logged in to comment

GET OUR NEWSLETTER


Splitcoaststampers's privacy policy