Circle Flip Up Book

by Stacey Carter

Create this quick album to highlight an event or person.

Supplies

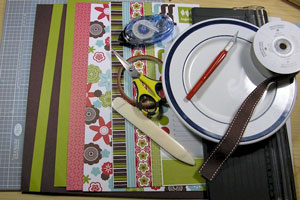
  • Circle cutting system( or cutting mat, hobby blade, and salad plate)

  • 4 pieces of cardstock for base of project

  • Bone Folder

  • Sticky Strip™ or other strong adhesive

  • SNAIL Adhesive

  • Scissors

  • Patterned Paper

  • Ribbon

Step-by-Step

  1. Step 1

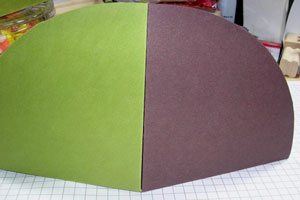
    Cut four circles out of cardstock. Your finished project will be 1/4 of the circle's original size.

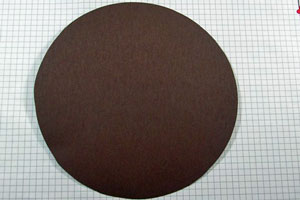
  2. To use a salad plate, place cutting mat on table. Put cardstock on cutting mat. Place plate on top of cardstock. Press down on your hobby blade all around the plate.
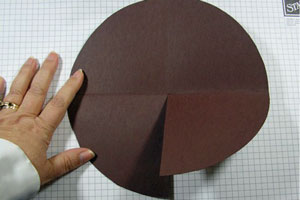
  3. Step 2

    Fold circle in half vertically using your bone folder.

  4. Step 3

    Fold circle in half horizontally using bone folder.
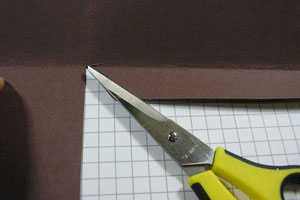
    image
  5. Step 4

    Cut on fold line up to center point.
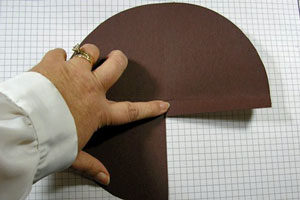
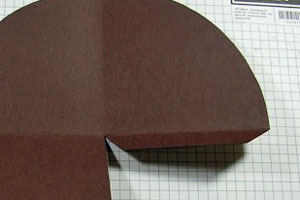
  6. Step 5

    Half inch down from fold line cut from right edge of circle to the middle fold line. This makes a flap on the lower right side.

  7. Step 6

    Cut at least 45 degree angle cuts on both sides of the flap.

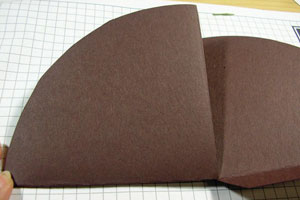
  8. You should now have 4 circles that look like this.

  9. Step 7

    Fold up the bottom left section.
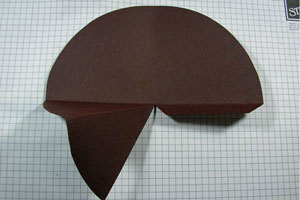
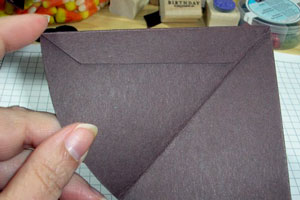
  10. Step 8

    With your bone folder fold the flap down in half. This will make a mountain fold.

  11. This is what your circles now look like.

  12. Step 9

    Decorate your circles.
    It is important that you decorate this project before assembly and not place any decorations on your fold line.

    Use any paper or accessories you desire. Here, the pieces from the circle that I cut off were used as a template for the scrapbook paper. I cut it in half when I put it on the mountain folded section.
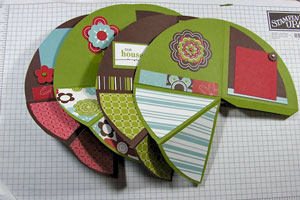
  13. Step 10

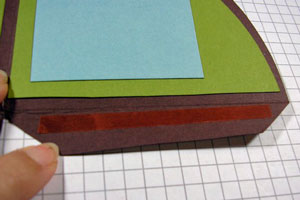
    Place Sticky Strip™ on flap close to the inner edge. This must be a permanent adhesive or they will fall apart.

  14. Step 11

    Slide the lower left hand section over the flap. The flap will be on the bottom.

  15. Step 12

    You now have 4 panels. You will attach the 1st panel to the 2nd one, the 2nd one to the 3rd one and the 3rd one to the 4th one. The 1st one is the front of your book. The 4th one is the back of the book.

    Place snail (or other adhesive) all around the edge of the panel and 2 stripes in the center. Line them up on the bottom corner and edge. Then smooth them together.
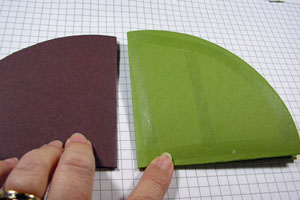
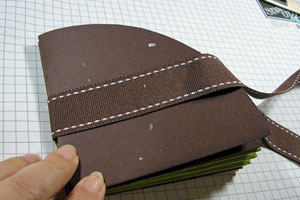
  16. Step 13

    Cut 24 inches of ribbon. Center the ribbon around the book. Tape the ribbon to the front and the back panels (not the spine).
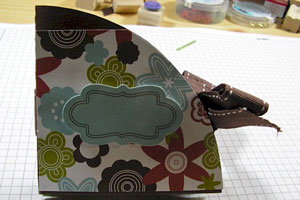
  17. Step 14

    Decorate the front and back of the book as desired.

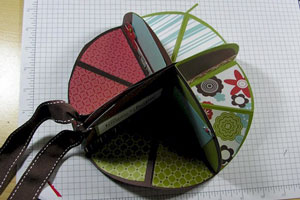
  18. Here is the book open. You can tie it open so it sits nicely on a table.

Your Turn

You've seen the tutorial, now you try it! We've got a section of the gallery set aside for Circle Flip Up Book. Try this technique, then upload your artwork to the gallery. Show us your creations!

***Please note - Internet Explorer/Edge is not a supported browser, and will not allow you to see the videos. Please use Chrome, Firefox or Safari to view our tutorial videos.

Questions and Comments

We'd love to get your feedback or questions. Leave your comment below.

Your tutorial is AWESOME!! WOW!! It is easy enough for a newbie like me to follow.

I do have one question, though, how do you use the Flip-Up Book once you make it? Does anyone have a sample with pictures added (I'm assuming that's what you use it for?) The pictures would have to be very small, wouldn't they.

Again, though, what an AWESOME tutorial. Thank you for sharing. I look forward to further suggestions for using it!!


Judy
Judy  |  Wed Dec 10, 2008 at 12:06 PM
What a cool book, and it looks like a lot of fun to make!! Thanks for a wonderful tutorial, Stacey
Rose Ann  |  Wed Dec 10, 2008 at 1:30 PM
I can't wait to make one of these. Great tutorial...TFS JoAnn
JoAnnBeachler  |  Wed Dec 10, 2008 at 1:30 PM
I would love to see one with Pictures also. This would be a cool Graduations gift using all school colors and announcment info. Thanks this is really cool..
karla Rice  |  Wed Dec 10, 2008 at 1:49 PM
I am glad you liked the tutorial. I would use wallet sized pictures in this book. If you used a dinner plate (and 12" x 12" paper), your pictures could be 3" x 5". I have used these to chronicle an event (like last years vacation, Homecoming) or as a fancy card ( Mother's Day or my 20th Anniversary card)
Stacey Carter  |  Wed Dec 10, 2008 at 2:38 PM
Super tutorial, and yes, I think I would like to see more photos, of the individual pages, and one all assembled (brighter, and closer up)...wish I could see it in PERSON!..lol..well, I do get the idea, and you did a GREAT job!
dianne shiozaki  |  Wed Dec 10, 2008 at 3:56 PM
What a wonderful Idea, especially for pictures, would like to see one done first, before I try. I think I got the idea. tyvm. Jan
Jan Keen  |  Wed Dec 10, 2008 at 4:32 PM
fantastic idea, i will try this after my holidays - good idea as a special card i.e.wedding anniversary or significant birthday. Thanks
sharyn  |  Wed Dec 10, 2008 at 4:54 PM
I don't get step #11 - is it the "back side" of the wedge shaped piece closest to the edge that sticks to the flap?
Melissa  |  Wed Dec 10, 2008 at 7:42 PM
This is great. I can't wait to make one but I also didn't understand step 11.
andi  |  Thu Dec 11, 2008 at 4:23 AM
This is a great idea! Wish this tutorial would have been a couple of weeks ago. We just had our HS boys' soccer banquet, and these would have made awesome centerpieces using pictures of the boys from our season and of course done in our school colors. Thanks for this! I can't wait to make one!!
michelle  |  Thu Dec 11, 2008 at 6:48 AM
I love this. I'm thinking this would make a great Mother's Day card.

Step 11 threw me for a loop at first also. I kept flipping back and forth between it and the finished product. The taped flap goes under the mountain piece. This makes a 3-D section that is 1/4 of the finished circle. The mountain is the floor and the other two uncut quarters are the walls. Maybe it would help if there was a picture of one finished section open before it is attached to the others?
Dawn  |  Thu Dec 11, 2008 at 6:50 AM
Great job on your tutorial! Thanks for sharing your talents with all of us. I am anxious to see all the artwork in the gallery.
Bette Lynn  |  Thu Dec 11, 2008 at 7:35 AM
WOW, WOW, WOW!
I LOVE IT!
CAN'T WAIT TO MAKE ONE.
THANK YOU FOR SHARING. ROSIE
rosie k  |  Thu Dec 11, 2008 at 8:06 AM
wow this is so lovely i just love it but can i use reg paper first before trying it on card's stock and what size of card stock's ? smile)
Roberta  |  Thu Dec 11, 2008 at 11:00 AM
Sure you can make your first one with "regular paper". When I make a pattern I almost always use copy or construction paper first before I ruin some beautiful cardstock or scrapbook paper.

What size of cardstock depends on what size of circle you are using. For my salad plate I used 8 1/2" x 11" cardstock. When I use a dinner plate I use a 12" x 12" cardstock.

I guess I have made so many of these that it becomes second nature to me. I will try to upload a picture or 2 to the gallery to make step 11 clearer.
Stacey Carter  |  Thu Dec 11, 2008 at 2:20 PM
LOVE THIS!!
Jen del Muro (genie1314)  |  Thu Dec 11, 2008 at 4:17 PM
I made one of these last night after the tutorial was posted and, while not a quick project for me, I loved every minute of it. I'm sure if I make another it'll go faster. I cheated a bit and used the scallop circles from last summer's mini catty so I didn't have to cut out my circles. I'm sure the final product was smaller than the one shown here since they are only 6" across, but I think the scallop edges were a nice touch. I've uploaded pics to the gallery if you're curious.
Kathryn  |  Thu Dec 11, 2008 at 6:45 PM
I love this! I have also seen this in a square format. Do you know if you do not cut this will the results be a square instead of a circle?

Great tutorial
NashvilleRebecca  |  Fri Dec 12, 2008 at 11:34 AM
Wow, this is so great! I also have to agree that using the big Carousel Notes (round ones) would make it a lot faster and easier, especially if it was a group class. But what a great idea...I may have to try this out over the holidays, once we get thru the Christmas rush! Jan
Jan (inkerzaway)  |  Sat Dec 13, 2008 at 10:01 AM

Page 1 of 2 pages  1 2 >

You need to be logged in to comment

GET OUR NEWSLETTER


Splitcoaststampers's privacy policy