Black Magic

by Wendy Weixler

Create a dramatic look by stamping on dark cardstock with light ink and coloring it.

Supplies
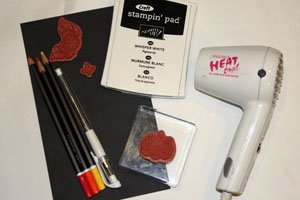
  • Black cardstock, or another dark colored cardstock
  • White pigment ink
  • Colored pencils
  • White gel pen
  • Heat embossing tool

Step-by-Step

  1. Step 1

    Stamp solid image in white craft ink onto black cardstock.

    Hint:
    Other dark cardstock will work as well.
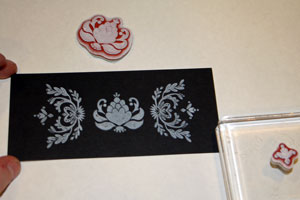
  2. Step 2

    Heat-set image with heat embossing tool.
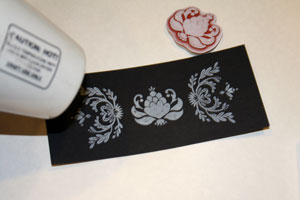
  3. Step 3

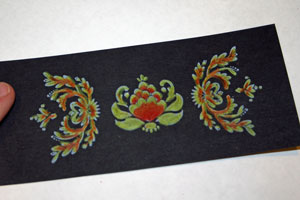
    Color image with colored pencils.

    Keep the lighter colors toward the edges of the image for a more dramatic effect. Start with the darker colors at the base or center of the image and work your way to the outside edge and lighter colors.
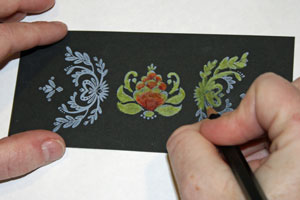
  4. Your finished image should look something like this. Don't be afraid to press too hard when coloring with the pencils. The richer the color, the greater the contrast.
  5. Step 4

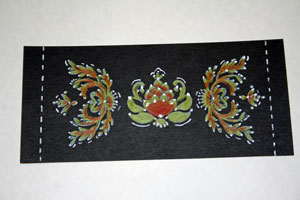
    Using a white gel pen, accent image with dots, and lines.
  6. Step 5

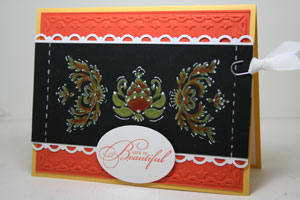
    Add image to card and embellish as desired.
Video!

Your Turn

You've seen the tutorial, now you try it! We've got a section of the gallery set aside for Black Magic. Try this technique, then upload your artwork to the gallery. Show us your creations!

***Please note - Internet Explorer/Edge is not a supported browser, and will not allow you to see the videos. Please use Chrome, Firefox or Safari to view our tutorial videos.

Questions and Comments

We'd love to get your feedback or questions. Leave your comment below.

Absolutely beautiful. Can't wait to try this.
Patti  |  Wed Dec 29, 2010 at 8:19 AM
Absolutely beautiful. I love this technique. Could you also tell us the size you made your black cardstock and the other features you used? Also, where would I find Whisper White craft ink? Thanks so much.
Joan Schoppe
Joan Schoppe  |  Wed Dec 29, 2010 at 8:33 AM
stunning!! where can i buy white pigment ink?
roxie  |  Wed Dec 29, 2010 at 8:54 AM
OMGosh!! This is beautiful...next stamp club for sure!! Thanks so much for sharing!!
Flowerfreak  |  Wed Dec 29, 2010 at 8:57 AM
wow, i've done the black magic technique before but with chalk. This method is so much more vibrant!!! Thanks for the great tutorial and I love your sense of humour grin
CeeCee  |  Wed Dec 29, 2010 at 9:00 AM
This absolutely gorgeous. I can't wait to try it.
Brenda Brown  |  Wed Dec 29, 2010 at 9:07 AM
This is fantastic! Thanks so much for sharing!
Sarah  |  Wed Dec 29, 2010 at 9:13 AM
Beautiful Wendy!! Thank you for the tutorial!!
Beth P  |  Wed Dec 29, 2010 at 9:18 AM
Hi I love your work and what I would love to know is what makes the gorgeous white lacy edges to your card on this black magic demo?
Is it a page punch?
As I can never make my look that good and I think it sets off the card!

Thanks Mary
Mary Kendrick  |  Wed Dec 29, 2010 at 9:42 AM
Thanks for all the lovely comments, everyone! To answer your questions:
The black piece of cardstock I used for my sample is 2 1/2" x 5 1/2" ...
The border punch used in the video is the Eyelet Border Punch by Stampin' Up ...
The white pigment ink (Whisper White Craft Ink) I used is also from Stampin' Up, but other manufacturers make it as well (Inkadinkado, Tsukineko, ColorBox, Ranger, PaperTrey) ...
Wendy Weixler  |  Wed Dec 29, 2010 at 10:04 AM
WOW!!! I can't wait to try this. My life is so busy (like every other Mom I know) but I'm going to make the time for this. Valentine's Day is right around the corner....I didn't make Christmas cards this year because of family, school, sick mother...you name it, there just wasn't time and I heard from people! "Where is your beautiful card this year?!?!" lol Guess I better get on the stick.
Thank you for your time and effort, it is much appreciated!
Susan Blando  |  Wed Dec 29, 2010 at 10:33 AM
Do you think this would work w/ prisma color pencils?? I have a lot more color choices than my SU watercolor pencils.

Great video, great tutorial!! Thanks!!
squirrellyshirl  |  Wed Dec 29, 2010 at 10:45 AM
This is beautiful and easy!! Great combination. Now I just have to buy a white stamp pad.
Elizabeth  |  Wed Dec 29, 2010 at 11:18 AM
will definitely be trying this. Just beautiful resuls. thank you
bunnyc  |  Wed Dec 29, 2010 at 11:21 AM
I second the question about Prisma color pencils. If not those, what would I need to use? They are the only colored pencils I have, but would love to try this technique. You make it look so easy and so dramatic. Thanks for the great tutorial.
Kate  |  Wed Dec 29, 2010 at 11:51 AM
Wow! Your card is amazing! Your coloring is an inspiration. I hope I can ceate something close to yours...it will be a challenge for sure!
Shelley Germann  |  Wed Dec 29, 2010 at 11:52 AM
Beautiful card. When I first looked at it I thought it was painted
Karen  |  Wed Dec 29, 2010 at 12:14 PM
Hi Wendy~

Thank you for sharing this technique again. I was just about to email you and ask you to walk me through it! Your results are so lovely!

Was there a version with a white crayon? I seem to recall it, because I went to my neighbor's houses in search of a white crayon? Do you know what tech I mean?

Please email me, so I will know.

Thanks, Sweetie!
Traci S.
Traci S.  |  Wed Dec 29, 2010 at 12:24 PM
Wonderful!! Thank you so much for sharing this! Can't wait to play!

I do have a question: Will our SU Watercolor Wonder Crayons work with this technique?
Jackie Perseghetti  |  Wed Dec 29, 2010 at 12:29 PM
Wow, what a fun coloring technique! You did a smashing tutorial...thank you!
Deebi547580  |  Wed Dec 29, 2010 at 12:34 PM

Page 1 of 5 pages  1 2 3 >  Last »

You need to be logged in to comment

GET OUR NEWSLETTER


Splitcoaststampers's privacy policy