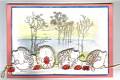
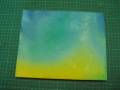
I stamped first to get placement for water color wash then choose a blue wash for the water and a pale lemon for the sky to imitate sunrise.
By the way the 2 hedgehogs on the right slide and tuck behind the hedgehogs on the left
Date: Wednesday, June 11, 2008 GMT Views: 837
Favorited:2
Registered: September 15, 2004 Location: MA Posts: 5982
Thu, Jun 12, 2008 @ 5:06 AM
wow very nice. love these trees. do you have a website . I would love to get this stamp.
------------------------------ WHAT IS A STAMPPIN ADDICT!
It's someone who buys stamps they didn't normally like at first,only to see it in Split Coast Stampers gallery in a different perspective.
Registered: January 11, 2006 Location: Western Kentucky Posts: 5988
Fri, Jun 13, 2008 @ 1:09 PM
This is so neat. Love the way you used the lemon in the sky. Like it all.
------------------------------ Janet - aka Ridge Stalker
Wife of 52 yrs, 2D, 2GD, 1GS, 3GGS
Check out MY GALLERYhttps://www.splitcoaststampers.com/g...0&ppuser=67069 Glitter Mafia member. Proud to be a fan club member. #67069
Registered: August 30, 2006 Location: Wollongong, just south of Sydney, Australia Posts: 183
Tue, Sep 23, 2008 @ 3:38 PM
Sliding card directions: General
Top layer
1. Stamp & colour background as desired.
2. Trim card to fit as a layer on top of your base card
3. Stamp moving image onto a scrap card.
4. Cut and colour as desired. Set aside for now.
5. Using a craft knife cut 2 slits 5mm apart where you want the image to slide to & from ensuring that you do not cut closer than 1cm from the edge of the card eg up and down the middle of the card. This is the sliding strip. (Also consider where the parts are when card is closed especially if fitting inside an envelope).
6. Now to make the actual sliders, take 2 narrow strips of card approx. 5mm wide and 15mm long (we�ll cut off the excess).
7. Make 2 folds along strip, one at 5mm and the other at 7mm. This is to wrap loosely around the sliding strip on the top layer card. Check that it slides easily up & down the sliding strip.
8. Glue both folded strips around the sliding strip ensuring that is moves freely. Cut off the excess.
9. On the front of the card attach the sliding image to the folded sliders with DST
10. Adhere a piece of narrow ribbon to the reverse side of both sliders
Base Card
11. Now the front is finished, you need to layer it onto your base card ensuring that you do not adhere where the sliding part go or where the ribbon protrudes beyond the card.
Advanced alternate idea as with the hedgehog card: If you want to tuck in the sliding image behind something then stick the front (non moving image) into place with a couple of layers of Magic Mount (double sided foam tape) ensuring that the tape is not obstructing the sliding image in any way. Have fun.