hmmm...I'm not sure written directions would make sense, but I could try it. Let me work on it and I'll try to post it back here in the next 24 hrs. or so. Thank you for the nice comments. I'm so encouraged!
Registered: July 13, 2005 Location: Loving life in PA Posts: 1346
Wed, Oct 24, 2007 @ 3:43 PM
I love your box! I too, would love to have the instructions. Please PM me with the details if you don't mind. Thanks for sharing your wonderful work with us.
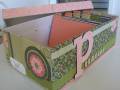
Your bone folder will be your best friend. Use it to make all your creases defined. That will prove to help you in the end when it�s time to open the box. There are MANY steps here, but don�t give up and be patient. Practice on something first. The assortment 6x6 pad is a perfect way to start as the box can be made in different sizes. 6x6 makes a very cute place setting or holder of mints at various places. The larger box as shown on SCS done with 12x12 turns out rather large and holds quite a bit.
STARTING THE BOX:
1. Take a square DSP outside up and fold corner to corner diagonally to create a triangle. Open the paper and repeat at the opposite corners.
2. Open this up and now fold it in half from side to side. Open this up and fold the other way. Now you have several creases in your paper.
3. Gently bring all the corners together, and the creases alternate folding in and out.
4. Use your bone folder to flatten the paper to complete the shape of a square. Check that 2 flaps are on each side. Smooth out with your bone folder. Make sure your tips are smoothed out.
5. Turn your folded square so that it�s facing you as a �diamond�. One point is open (where the corners met) and the other is closed. The closed point should be at the top.
6. Fold the bottom, now side edges of the square to the center crease. You will do this on the left and right and then turn it over to repeat on the back side. Now you have something that looks like a �kite� or a spin top that�s flat.
7. The pieces that you just folded inward, now it is time to pop them up and fold them flat so that it alone looks like a �kite shape�. You want to do this to each fold so that�s a total of 4 times.
8. This is difficult to visualize, but hang in there. Play with it until you get it right and don�t hesitate to email me with q�s. The important part is to watch your tips. Again, this is where you need your bone folder to make good centered creases.
9. Now, this new flattened fold needs to be folded back behind itself. This again, will be done on each front and then turned over and done on the back 2 sides as well.
10. Your paper should now still have the top point virtually untouched. Then a wide middle and then a long pointed end that has many layers. Fold from the top down, making a crease at the widest point of the box. Fold it and crease it well both directions. It still lays upward, but you have just made a line or crease across the widest part.
11. Your long pointed tip (which you have 4 of) get folded up to the wide based crease you made in step 10.
12. Last fold: You just made a crease where the tip met the wide base. At the point where this tip �bends�, add another bend on all 4 sides.
13. At this end is the opening of your box. Gently pull your box open and push out the sides as you push the top tip up.
14. The origami star box is intended for the points to stick out. However, for my boxes and purposes, I put mini glue dots on my box which makes it no longer origami, but I wanted my points secured down.
15. I made the medallion of course, using the tab punch to make my circle and then the scallop punch with tiny hole punches in each �petal�. Then a few circle punches and then finally the flower on the Spring Flower Bouquet punch.
This is very difficult to visualize. This is much easier to understand in a follow the leader fashion.
thank you everyone for all the wonderful support! I hope I got everyone who pm'd me but if not, I've posted the directions on each box. Be sure to let me know if you need help in making your box!
Registered: May 6, 2007 Location: Melfort Saskatchewan Canada Posts: 16
Sun, Oct 28, 2007 @ 7:25 PM
Thank you for the directions. I unfortunately can not figure them out. I think it is more that I am a very visual learner the your instructions. I am stuck at step 3. Not sure how you can help but I thought I would say thank you anyway for taking the time. I will try again in a few days with a fresh brain LOL!
Don't feel bad,...many get stuck there. So... you have a square piece of paper now with all these creases in it right? Since it is still square, each as a corner, so what if you brought all those corners together and watched where the creases go....can you visually see another smaller square appearing? Keep trying, it's not as hard as you might think, but it IS MUCH easier to see if visually and follow.
Registered: May 6, 2007 Location: Melfort Saskatchewan Canada Posts: 16
Mon, Oct 29, 2007 @ 12:15 PM
So when you say in step 3 the creases alternate folding in and out you lose me. I thought I had it right but then got the step 5 and yikes the one point being open and one closed thru me for a loop. i will keep at it though. I do not like to back down from a challenge.
thanks