SCS has been so inspiring ~ I'm finally sharing my uploads with all of you ~ gallery started 8-29-06!
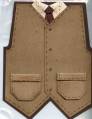
This is a take off on a vest on SCS earlier this summer, but I am a seamstress, so tweaked it for a more realistic armseye shape.
BG stamp the vest and shirt "fabrics" first. Stamp the shirt and pockets on both sides as you will fold part of it over.
Armseyes: word window punch, extend longer to the shoulder
Shirt, neck opening and front lower V: 1-3/8" square punch
Shirt collar: Snip the shirt square from one corner to almost the middle and fold down the collar points. Secure with a dot of crystal effects after tucking the tie underneath.
Tie: loop the grosgrain over a length of twine, snip shorter and tuck under the collar, secure with CE.
Pockets: tag punch, fold over the top "trim"
Buttons: spaced with mat pack guide (or that terrific spacer at the top of the order form ~ make sure you include one in every customer order and tell them about your free gift to them...), buttons would be great with brads or 1/8" punched circles if you really want to putz with it!!
I made 35 of these for convention II swaps and the marker buttons were much faster!
Enjoy a great men's card!
SIGI ~ Stamped In God's Image
Date: Tuesday, August 29, 2006 GMT Views: 1844
Favorited:79
Registered: April 5, 2003 Location: Whidbey Island, WA Posts: 22041
Sun, Sep 03, 2006 @ 12:20 PM
Very cleverly done!
------------------------------ Julie Ebersole (JulieHRR once upon a time . . . )julieebersole.com"So shines a good deed in a weary world." -Willy Wonka
Registered: July 18, 2005 Location: No matter where you go--there you are! Posts: 2963
Wed, Nov 01, 2006 @ 12:47 PM
Your attention to detail is amazing. I bet you are a great seamstress, too. I'm so glad you decided to share your creations with us. And thanks for sharing your instructions, too. It sounds like it would be a real time-saver to have both a large square punch and the word window punch (not to mention the tag punch).