Hi, sweet friends! Once again I am joining in the fun of making Christmas cards this year for the Fan Club Christmas Challenge here at SCS! I'm thrilled to see my stash of Christmas cards growing already - and it's only March!
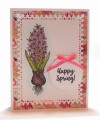
Since I didn't finish up my card this morning and saw the Ways To Use It challenge today, I was even more happy. I love 3D paper piecing and have five layers using this poinsettia plant that brought back so many wonderful memories of my mom and how she loved decorating for Christmas. Such a wonderful time to remember my beloved mom.
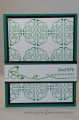
After stamping and coloring several of the main image (leaves and poinsettia), I started cutting. And of course, one of the good things about 3D paper piecing is not having to worry too much about the coloring underneath some of the places where the layers overlap (but I did use a black marker for the cut edges). Then I used an Empressor tool to shape each layer (including the sweetly wrapped container) and started adding some dimensionals for each layer. I found this piece of DP that seems to work well for the offset placement of my focal image and sentiment. I used scalloped borders - and then used my Mini MISTI to stamp the sentiment, added the poinsettia oval...and it was done! Yay!
I hope you get inspired to join us as we make our 2018 Christmas cards throughout the year! And I am thrilled to be doing today's Ways To Use It challenge. Thanks, Lisa, for a fun one today. And thanks, Stacy, for yet another fun Christmas card challenge. You gals rock!
Thanks for taking a closer look at my card! Much love, and warm hugs to you all! xoxo
P. S. I forget to add the Copic markers I used. Red poinsettia leaves and ribbon - R21, R22, R24, R29; green poinsettia leaves and pot stripes - YG01, YG11, YG13, YG17; poinsettia center - Y15, Y26; shading - W1. (And, yes, poinsettia leaves eventually all turn red given enough time. They are native in South Florida, and we have some in our yard.)
Date: Thursday, March 1, 2018 GMT Views: 2213
Favorited:12
Paper: Solar White #80 and #110 (Neenah), Pure Poppy (PTI), Brioche paper pad (Memory Box)
Paper Size: A-2
Ink: Tuxedo Black (Memento), Onyx Black (Versamark)
Accessories: Copic markers, Blueprints 20 dies (MFT), Layering Oval dies (SU!), Mini MISTI tool, black marker (SU!), Empressor tool for shaping, 3M dimensional tape, Mono Liquid Glue (Tombow), white tape
Splitcoast Dirty Dozen Alumni SCS Gallery Moderator Splitcoast Challenge Hostess Teapot Tuesday TEAm
Registered: July 27, 2007 Location: Dublin, Ireland Posts: 131502
Thu, Mar 01, 2018 @ 12:09 PM
What beautiful DP, and an equally beautiful pieced poinsettia, Cheryl. They are certainly ideal for all that layering...and how lovely that warm memories came along with it.
Registered: September 2, 2007 Location: Posts: 877
Thu, Mar 01, 2018 @ 1:40 PM
Hey my friend, you just put a smile on my face. This is a beautiful card. I love it!l How wise of you to start making your Christmas cards early. Good idea. Make some more Christmas cards so you can put a smile on my face again!
Hugs,
Kerry
Registered: October 19, 2007 Location: Packer Country, WI Posts: 71970
Thu, Mar 01, 2018 @ 6:28 PM
The details you put into your cards is amazing....love the dimension you created on the vibrant poinsettia with the black edges. Thanks for sharing how you created it. Hugs
Registered: November 1, 2005 Location: Posts: 77159
Thu, Mar 01, 2018 @ 6:32 PM
Cheryl this is very pretty. I really love layering flowers and cutting between the petals, awesome job. The scallop border and the designer paper are wonderful background. I am sure your mom would of loved this.