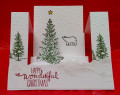
The theme was to make a card featuring a Christmas tree. I had seen Priscilla's (catluvr2) center step card on Splitcoaststampers (IC527 Fenced In by catluvr2 at Splitcoaststampers) which inspired me to make my own version. I REALLY like hers, too!
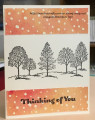
I used the snow covered trees image from the Stampin' Up! Happy Scenes stamp set to stamp trees on the side "columns" of the step card using SU Garden Green ink. BE SURE to lay a scrap piece of paper down onto the part of the card you DON'T want stamped to prevent the trees also inking the center fold area.
I then used the timeless SU Lovely As A Tree large pine tree stamp inked with SU Garden Green ink and stamped the tree on a scrap piece of the thick Whisper White cardstock. This beautiful image I then "fussy cut" out with paper snips. I wanted it to appear as "see through" as possible, so I sometimes used my tiny little snips to get into tight crevices.
Then I used some scrap regular thickness SU Whisper White cardstock and tore a strip wider than my card to appear like snow banks. I used both pieces to create overlapping snowbanks, which I glued down with Tombow glue. I then applied Versamark ink (Tombow glue is fine, too) with a Sponge Dauber to make the torn edges sticky, before pouring SU Dazzling Diamonds glitter onto the edges. Instant glistening snow banks!
Next I ran the entire card through my Big Shot inside the SU Softly Falling Embossing Folder. I positioned the card so that the heaviest snow was at the top of the card. This gave the entire scene a holiday snowfall look.
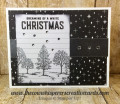
Next came the background panel. It is a 3-1/2"x 3-3/4" Whisper White cardstock onto which I stamped the star and polar bear images from the SU White Christmas set. I stamped these with Versamark Black Onyx ink to make the images crisp and dark. Note that I decided WHERE to place these two images by inserting the panel into the last valley fold of the card, and moving it up so the top of the panel was even with the top of the card WHEN IT IS FOLDED. I held it in position by hand, and made very light pencil marks where I wanted the star and bear to be. Because I wanted the star to be sitting atop the hand-cut tree when the card is closed, I laid the cut-out tree unglued into the FIRST valley fold before I marked where I wanted the star to go.
I used an SU Yoyo Yellow Stampn' Write Marker (retired) to fill in the star after the black ink had dried. Then I ran the stamped panel through my Big Shot inside the SU Softly Falling Embossing Folder placed so that when the card was closed, the density of the embossed snowflakes would be similar to the density of flakes on the two side columns where the trees had been stamped.
I then used really strong Tear & Tape to attach the stamped and embossed panel so the top lined up with the top of the card when when folded close. I also used Tear & Tape and Tombow glue to attach the cut-out tree inside the first valley fold so that it appeared in the middle-ground in front of the star and bear panel. Remember to only glue the very bottom of the tree since the top part isn't attached to anything in this 3-D card.
Finally, I laid the card out flat, and using Cherry Cobber ink, stamped the sentiment from the SU Wondrous Wreath set onto the very front left corner of the card.
Because this card required some fussing to get images stamped where you want, a special center-step-fold technique, and careful masking, I am rating this card as a difficulty level "4".
Date: Tuesday, October 3, 2017 GMT Views: 2589
Favorited:4
Registered: February 13, 2006 Location: Central Texas Posts: 104
Sun, Dec 02, 2018 @ 5:03 PM
This is beautiful! I was checking out new ways to use my favorite Lovely As A Tree this year, and stumbled on this. I can think of one of two hand made card lovers who would love something as lovely as this! (Everyone else will get a CAS card! LOL)
------------------------------ Joni Kelly LMT "No weapon formed against you shall prosper,..." declares the LORD. Isaiah 54:17a NKJV