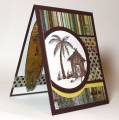
Measurements: white image panel – 1 5/16” square, 1/16” black border, designer paper 1 11/16” wide, 1/16” white border, black punched panel– 2 3/8” wide
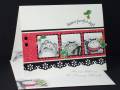
-Prismacolor pencils, baby oil and paper stumps were used for coloring my monster using the Gamsol techniqueÂ…use the oil in place of the Gamsol.
-With the exception of the flower on the far right image, all flowers and leaves were cut out and glued to the card.
-Diamond Glaze was used to attach the nail heads.
-The out of the box image with Nestabilities is done using a technique similar (I omitted a step or two) to JulieÂ’s which you can find here and IÂ’ll explain for those that donÂ’t wish to leave SCS for directions how I do it: I lie the Nestabilities die cut on the image panel and position it. With a pencil I mark the inside edge of the die cut on each side of the tail and remove the die cut. I cut slightly further than my pencil mark. Slide my die cut under the portion that will be out of the box and secure with repositional tape (I use the blue painters tape). Run through the machine to cut then emboss and remove the die cut and itÂ’s ready to color. I color after cutting just in case I make a mistake.
Date: Tuesday, July 21, 2009 GMT Views: 3986
Favorited:49
those images are just too cute...and you colored them so beautifully....love the little sprigs of leaves and flowers to add dimension...also love that you stamped the inside of card and envelop as well...