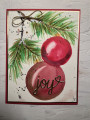
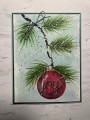
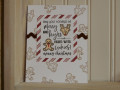
I followed the tutorial pretty closely. I did do an initial base with a bluish wash before starting on the branch. I decided to put the sentiment on the ornament with a die cut single word that would fit. Placed a few pearls and it was finished.
Thanks for looking.
Date: Friday, November 17, 2023 GMT Views: 617
Favorited:2
Registered: February 23, 2016 Location: El Paso, TX Posts: 23000
Mon, Nov 20, 2023 @ 4:38 AM
WOW - everything about this is just fabulous!! LOVE, love, love the gnarly look of your branches and the way the bauble is nestled into the pine needles. Pat yourself on the back for a job well done.
------------------------------ Linda aka Bubbles
I'm not a Hoarder . . . I'm the Curator of an extensive collection of embellishments!!
Proud Fan Club Member Guest Designer Color Challenge July 2017 Favorites Notification Team
Registered: March 20, 2008 Location: Hamilton, Ontario Canada Posts: 615
Mon, Nov 27, 2023 @ 12:02 PM
Those pine branches look so real, your strokes are so elegant for each needle individually and as a whole composition. Your painted background sets off that stunning branch perfectly--your focal image shines as a result, and I am beyond impressed. Your ornament has that gleam and light, your artistry is wonderful! What you create is truly very special. That metallic joy sentiment is just the perfect touch without taking anything from your wonderful painted art. I keep staring at various elements and then the whole, it is truly lovely!!!
I want to thank you for leaving a comment in October on a card I made for my nephew's birthday, a card with hand stitching as its focus. What I have been creating with hand-stitching is not the norm for SCS, so when I receive a comment, it is a big deal to me, so just know that your kind comment really touched my heart, thank you again.