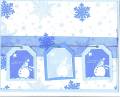
This project is heavily influenced by multiple samples on Splitcoast Stampers. This is another of the projects made in my October "Sassy Stampers" class. We made the 6x6 page protector pouch as a ribbon-handled purse to hold the tags we made from the Terrific Tags Punch Box kit. The Certainly Celery cardstock is 6 1/2 x 8 1/2, scored at 6 1/2 and 6 3/4. The patterned paper is 6x6 and is slipped inside of the page protector (to hide the sticky strip tape). The hemp is merely wrapped (not tied) around the fasteners. The bottom fastener (on the plastic page protector) was positioned using the self-healing mat and awl from the Crafters Tool Kit. 6x6 page protector (cutting off the holes down the side).
Date: Monday, October 10, 2005 GMT Views: 3839
Favorited:144
I love this! Great colors, so cheerful! I'm waiting for my kit to come (tomorrow, yeah!). I know this is probably a dumb question but maybe you can help me. On the tags with more than one color, do you use markers? Or is there a trick to using more than one color of the spot inks included in the kit on one stamp? I saw this demo'd at a meeting & she had numerous tags with more than one color from the kit, it looked inked not done with markers, can you help?
------------------------------ Susan My Gallery Live Well, Laugh Often, Love Much
Registered: August 4, 2004 Location: Coolidge, AZ Posts: 1577
Tue, Oct 11, 2005 @ 7:14 PM
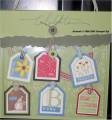
The multiple colors on the tags are because I stamped the tags using different colors and then cut out the specific words and glued them on. I also colored a few of them by using blender pens lightly touched to the tips of the various markers.
Thank You (yellow flower petals watercolored with blender pen and black center cut from a second black tag using the 1/4-inch thumb circle punch).
For You (black dots colored in with marker)
Friend (first tag stamped in celery, second tag stamped in brocade and the word "Friend" cut out and glued to the green tag. The flowers and leaves are colored with markers.)
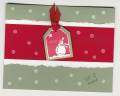
Snowman (stamped in basic brown, second tag stamped in brocade and the word "joy" cut out and glued to the brown tag. The snowman is colored with blender pens.)
Baby (stamped in celery, second tag stamped in brocade and the word "baby" cut out and glued to the celery tag)
Happy Birthday (stamped in celery, second tag stamped in real red and the words "happy" and "birthday" cut out and glued to the celery tag)
Because I had 21 people over 3 classes do this project, a fellow stamper friend suggested I stamp the tags in their appropriate colors and leave them that way as samples, so the class attendees would be able to figure out how many of each tag to stamp and in what color. It made that part of the project go much quicker (10 minutes to stamp all images), and then the normal cutting out part and coloring of the tags were another 35 minutes. But everyone had so much fun learning to do this.
Registered: December 17, 2004 Location: Indiana Posts: 982
Wed, Oct 12, 2005 @ 7:32 AM
This is wonderful! I was getting ready to make one today for a stamp camp tomorrow night! I love how you used the designer paper to hide the adhesive strips! Great idea! I'm so glad I saw this one before I made one! I love your changes to it. TFS
Registered: January 7, 2004 Location: Hillsborough, North Carolina Posts: 615
Sun, Oct 16, 2005 @ 12:20 PM
I love this SOO much! Would you mind emailing me about your sassy stampers club projects? [email protected] I am very interested in your layout for that class. (gee, wished I lived closer so I could go myself) I love you latch cards too.
Registered: June 10, 2004 Location: Duvall, WA Posts: 531
Fri, Oct 21, 2005 @ 9:14 PM
AWESOME!!! thanks so much for sharing!! you are the bomb!!! i'm loving your style....into my favorites for sure!! and if you do share your sassy stampers club projects...i'd LOVE to see.... [email protected]
loves!!
jen
------------------------------ want to see what i've been up to? My Stampin' Spot