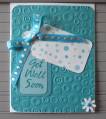
-For the border around the Top Note panel I cut a second piece of cardstock and cut tip to tip both ways. So youÂ’ll actually be making three cuts, #1 line up two tips on your cutterÂ’s edge and cut, #2 and #3 is easy because you now have a straight edge, place the tip on the cutting edge and make your cut.
Now just place under the main panel and secure, I have about a 1/8” gap between the pink layers on each tip. The border won’t be a perfect width all around.
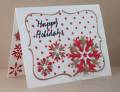
-White snowflakes and stars are a Cuttlebug die cut named Snowflakes #2; pink portion is a Marvy punch. Its glittered paper so Diamond Glaze worked well to assemble them and AleeneÂ’s tacky glue worked fine to attach to the card.
-Tools used, Cuttlebug and Snowflakes #2 die cut Herringbone embossing folder, Shapeabilities, Martha Stewart and Marvy punches, Sizzix Stampin Up exclusive Top Note die cut, ¼” circle punch
Date: Monday, December 7, 2009 GMT Views: 1215
Favorited:16
Registered: October 28, 2009 Location: London, UK Posts: 3254
Tue, Dec 08, 2009 @ 9:10 AM
How very beautiful! I love how you used the colour combination on your snowflakes. And I love the snowflakes inside your card too - such a thoughtful touch.
Registered: June 2, 2007 Location: Regina SK Posts: 17494
Thu, Dec 10, 2009 @ 10:04 PM
Lovely use of the snowflakes and I really like the way you split brown the top note
------------------------------ Kathleen
For by grace you have been saved, through faith; and that not of yourselves, it is the gift of God... Ephesians 2:8