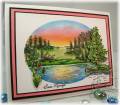
For my card, I used a new set, Scenic Byways, for most of the images inside the oval.
Except for the dimensional tree and cattails on the outside of the oval, everything was masked and stamped on the one layer of white c/s. To create the reverse oval mask, I used the largest oval Nestie from the Petite Oval Large set and die cut the oval in a sheet of copy paper and used the frame part only.
I placed the mask w/ the oval opening in the center of my c/s and began stamping and masking (where needed) my scene. The color was sponged on. After I finished, I removed the oval mask, stamped the tree at right (to get the water lines on the white area) and attached my colored (w/ markers) and cut out tree and cattails. The sentiment was added and I also added some white highlights w/ a white gel pen.
The panel was edged w/ a black marker then attached to a textured coral layer, then a thin black mat. I attached the layers w/ foam tape to the front of a 5 x 6.5 white card.
Thanks so much for looking
My blog:The Write Stuff. Sorry! I had to delete a bunch of really old posts from my blog & this is one of them.
Date: Saturday, June 27, 2009 GMT Views: 1164
Favorited:15
Registered: June 29, 2004 Location: Sugar Land. Texas Posts: 79827
Sat, Jun 27, 2009 @ 9:59 PM
Julie, just gazing on this beauty cools me off from the super hot temperatures we are experiencing here around the Houston area. Your coloring is incredible and I always love seeing your latest masterpieces!!
------------------------------ LizThe joy of the LORD is my strength.Right Brain Madness --My blogProud member of the redDivasKSS certified multi-step stamperFan Club member since 2004