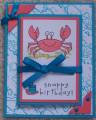
This is what we made at my Technique class for June. I was trying to design a 'simple' suspension card. Turned out okay. Sold 2 eScape bundles, since I used the Circle of Friendship set! On the other side of the suspended circle is the orange from Tart & Tangy. Wanted something summery.
Text on card: (I got this from the SCS resource section.)
Suspension Card
• 1 3/8” & 1 ¼” circle punches
• Cardstock for card base and for the layer that your suspended image will be nestling in
• Sticky Strip & Dental Floss
Use a 1 3/8” circle punch to make a window in the cardstock layer. Position the cardstock layer over the card base and mark where the punch window is. Punch this out with the same circle punch. Stamp two images and punch them out with the 1 ¼” circle punch. Apply Sticky Strip to the back of both punched images and over and under the punched window on the cardstock layer. Tape a piece of dental floss on the backside of your cardstock layer, centering it in the punched opening. Take one of the 1 ¼” circle images, center it in the 1 3/8” window and tape it to the dental floss. Add an extra layer of Sticky strip over the tape holding the floss down. Don’t remove the red plastic liner yet. Flip cardstock layer around. Add second 1 ¼” circle image, lining it up with the back of the first image and tape them together. Remove the red liner of Sticky Strip and apply more adhesive around the rest of the cardstock layer. Apply to the card base, lining up the circle openings.
Date: Tuesday, June 17, 2008 GMT Views: 1325
Favorited:14


 Sold 2 eScape bundles, since I used the Circle of Friendship set! On the other side of the suspended circle is the orange from Tart & Tangy. Wanted something summery.