I taught this image procedure to my two friends. I design the card, they come over and I teach it! When they donÂ’t behaveÂ…they stay after classÂ…DonÂ’t you Jan!!! Sharon is my good studentÂ…she always does it right or doesnÂ’t care that itÂ’s wrong! Jan is like meÂ…everything must be perfect and the three of us make a happy trio!
Okay, on to the card!
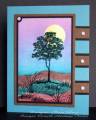
-I punched a circle from a post it to mask off for the sun, make sure you punch the sticky part!
-I cut a wavy line on a post it to mask off the ground area. Cut the post it in half so there is sticky on both pieces because you will use both of them before youÂ’re done.
-Using a brayer I inked up from the yellow end of a Happy Birthday multi colored Big and Juicy ink pad from Ranger.
-I brayer straight across and pick up the brayer and take it back across the card and brayer again, reinking the brayer a few times.
-Remove the sun mask. Using an artist brush with just a touch of water, I streak across the sun to bring the sky color over it.
-Now take the second cut of the post it and cover the sky. Cover the lower section with a post it that has been torn for more definition to the close up landscape and brayer on the brown, reposition the post it notes and add the green, move again and brayer on cranberry then I sponged some brown over the cranberry to reach my desired color. I also did water streaking for the ground area. That does help blend the lines and give some character/texture.
-Fill in the tree using reinkers.
-After stamping the grass image I freehand some stems and dots for flowers using Sakura gel pens.
-Stamp the grass image on the brown area with the like color to add texture to the landscape.
My inspiration piece for the ground area was an online art poster although my finished piece looks nothing like the poster.