Registered: June 25, 2004 Location: Idaho Posts: 1320
Thu, Feb 24, 2005 @ 9:36 AM
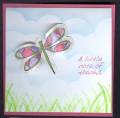
Very pretty! Love the sky and the colors you chose for the dragonfly.
------------------------------ When the toast is burned and all the milk has turned and Captain Crunch is waving farewell.. When the big one finds you, may this song remind you that they don't serve breakfast in hell... newsboys
Registered: May 14, 2004 Location: Texas Posts: 782
Thu, Feb 24, 2005 @ 10:24 PM
Superstamper, actually I made the clouds with the cloud template. (I don't think the aquapainter would do clouds?) But here are some directions I will paste from one of my class handouts that I did recently:
6. To make the clouds: Take your SU Cloud Template, and line it up so that it just barely covers the tops of the flowers. You always want to start your clouds as low as you can, then work your way up.
7. Get your quarter sponge, and lightly dab a corner of it into the Bliss Blue inkpad. Rub the small corner of the sponge along the EDGE of the cloud template. Focus all the color right along the edge, so that it makes a concentrated – but faint – line of color above the template. (Practice if you need to, on scratch paper). You can also use a sponge dauber for this if you have one, rather than the sponge wedge.
8. Now lift your template and raise it up a bit, to make another row of clouds. Repeat if you have enough room, at the top of the card.
The KEY to good clouds is: start as low as you can, and work your way up!!
Does this help you? The cloud template is in the catalog, it's cheap, less than $5, I make clouds on everything!!! It's a great filler when you have too much whitespace at the top of a card. Hope this helps?!