This is one of my fav techniques and I haven't done it in a while. Thanks for reminding me with your trip down memory lane.
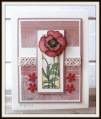
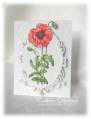
I know you are supposed to use mulberry paper, but I have every color except white. So I used plain old tissue paper. The cheap kind. Some has a coating on one side and that doesn't really work. I also used dye reinkers diluted in water and mixed in little spritzer bottles. So after I embossed the little images onto the white tissue paper, I put it in a shallow pan and spritzer with the different colors. Then put it between two sheets of blank paper and ironed. I used a large deckle scissors around the edge.
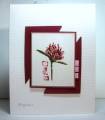
I stamped two of the main image and colored both with Twinkling H2O's. I cut out the rectangle, flower and leaf of one and attached on top of the other with foam tape. I attached it to the larger batik piece. I took a larger piece of the blue and cut the center out to make a frame and attached it all to a peach card front. (The peach that shows thru around the image is the card front, that's why it looks brighter.) TFL
Date: Monday, January 7, 2008 GMT Views: 1339
Favorited:2
Registered: June 10, 2007 Location: BC Posts: 44872
Mon, Jan 07, 2008 @ 7:37 PM
Really eyecatching!! Thanks for more or less explaining the way you did it!! I've never tried batik, and it looks fascinating! The twinkling H20's on the flower and leaf - and the 3 -d of them look great!! Fab card!
Registered: October 21, 2007 Location: Alberta, Canada Posts: 6707
Mon, Jan 07, 2008 @ 8:20 PM
Very nice card.
------------------------------ Lynn
SCS Fan Club Member "Everyday is a gift, that's why they call it the present." author unknown http://jellybeandancer.blogspot.com/