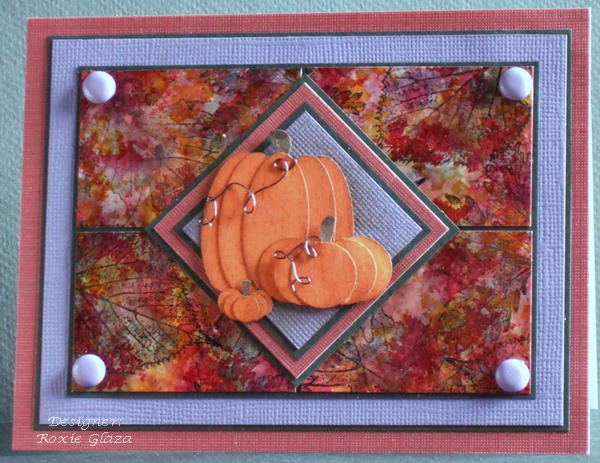
*The background tile panels are done in the polished stone technique with alcohol inks then stamped in black.
*The pumpkins are: large - small oval punch, medium - ½” circle punch, small - ¼” circle punch and yes I had to much time on my hands on a rainy day! But I like my mini pumpkin!
I first stamped the orange with the Weathered background, toned down the orange color with Tea Dye, edge distressed with Vintage Photo on the two larger ones. With a Close to Cocoa marker I went around the edge of each of the small pumpkin circles and around the two larger pumpkins after they were assembled.
*The two middle pieces on each pumpkin was cut down in width before assembly with glue and a straight pen for application.
*The stems are freehand cut with a little marker work at the top then glued to the pumpkin back.
* The wire is shaped then single sided taped to the back – if it sticks up just bend the wire with the pumpkin backwards and it’ll lie down where it belongs.
*The large pumpkin is glued to the purple panel, the medium and small pumpkin each have either ¼” or 1/8” circles punches glue in a stack behind them so they lie even on the card.
*I didnÂ’t time myself but I would say it took about twenty minutes to get the pumpkins built and attached to the card.
Date: Tuesday, August 21, 2007 GMT Views: 5722
Favorited:137
Accessories: Small Stampin Up oval punch, ½, ¼”, 1/8” circle punches, block and felt for polished stone, brads, tacky glue, double and single sided tape, wire, sponge, marker