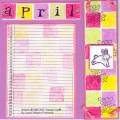
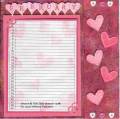
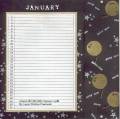
I just started a birthday book. These are actually books with pockets on the end to store cards for birthdays and events so you'll have what you need ready when you need it. The dates on the calendar allow you a space to write the people's names in so you won't forget their birthday/anniversary or whatever it is you send cards out for. I thought I'd make one for dh's grandma for her birthday this upcoming weekend. These will make wonderful gift ideas for Christmas/Hostess Appreciation etc. You can find all the info with the pdf file for the calendar pages here http://www.stampingnetwork.com/creat.../birthbook.htm
You will need to make some modifications to 8 1/2x 11 carsdtock as it is smaller than A4 that she uses for instructions. You will also want to make one change to your pocket flaps as 1" is not enough.
First of all, the pockets need to be scored more than an inch. TWO inches is good! :o)
Now for the Mountain/Valley folds: You will need 5 mountain folds plus the leftover end pieces of the cardstock. If you score every inch as she recommends you will not have enough mountain folds on an 8.5 x 11" sheet of cardstock. Here's a way to correct that.
Lay your cardstock along the 11" edge and score it at 5 1/2". Then score it at 6 1/4", then 7", 7 3/4", 8 1/2", 9 1/4". Flip your cardstock around 180 degrees and score again at 6 1/4", 7", 7 3/4", 8 1/2" and 9 1/4". You will have 11 score marks total, each 3/4" from one another from the midway point (jeeesh, I hope this makes sense LOL). When you start fan folding, you will end up with 5 mountain folds and the 2 extra long flaps as shown in Trish's diagrams. Now when you start adhering your pocket pages, all 12 will fit in the "spines"
I am putting my book together differently as I have one of those binding machines so I cut a sheet of US Vanilla 8 1/2" x 9 1/2", punched all the holes so I could spiral bind it into a book then I adhered my pages to that. It's really durable and can be laid flat when opened and I think will hold up to abuse better than the cardstock spine she makes for hers. Just another way to do it if you want to.
Date: Wednesday, January 19, 2005 GMT Views: 1374
Favorited:27
Registered: December 3, 2004 Location: Bourbonnais,IL Posts: 8349
Wed, Jan 19, 2005 @ 8:18 PM
This is awesome! Thanks so much for posting the links for directions. I can't always see the images well enough to tell what's what! I'm a visual aide type of gal. Thanks again for sharing! Your work is beautiful!
------------------------------
Kim
"We must not, in trying to think about how we can make a big difference, ignore the small daily differences we can make which, over time, add up to big differences that we often cannot foresee."
Registered: May 7, 2003 Location: Laycock house of cats Posts: 10662
Wed, Jan 19, 2005 @ 9:50 PM
My goodness You are so beautifully organized! Thanks for sharing the pic and the directions. You are inspiring me to get my act together and replace my boring 'ol "birthday book" (Mead brand store-bought notebook) with something like this!
Registered: February 19, 2004 Location: Sunny AZ Posts: 342
Wed, Jan 19, 2005 @ 9:57 PM
Michelle, I cannot TELL you how thrilled I was when I was on her website the other day and saw THIS BOOK! I was like...OMG....I now have a gift idea to make for dh's grandmother this weekend LOL I have 5 months left to finish so hope to work more on those tomorrow! I am honored to have inspired YOU! I get so much inspiration from YOUR work and I occasionally case it too <grin>!!! Glad I can reciprocate from time to time You are all welcome for the URL to the instructions. You need to check out her website. I've been subscribed to her newsletter since I started with SU and she totally amazes me with her experimentation and creativity! Teaready, I don't know why you can't see pictures on her site. I hope you were able to get on it though!


 You are all welcome for the URL to the instructions. You need to check out her website. I've been subscribed to her newsletter since I started with SU and she totally amazes me with her experimentation and creativity! Teaready, I don't know why you can't see pictures on her site. I hope you were able to get on it though!