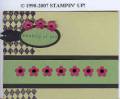
I appreciate everyone's comments on the first version. Here is a 2nd offerring. I added a brad that I embossed with white EP and Iridescent Ice EPand some small pearls on the edge. I'm torn. I like the small pearls on the edge, but I'm not sure about the white brad in the center of the flower. Again, any feedback would be appreciated.
Date: Monday, June 25, 2007 GMT Views: 1547
Favorited:46
I think this stamp set looks really fantastic in black and white. I like the brad in the center of the flower. I think it finishes it nicely. It's hard to get the full effect of the iridescent ice on the brad in the photo though.
Registered: January 6, 2004 Location: Connecticut Posts: 20543
Tue, Jun 26, 2007 @ 10:00 PM
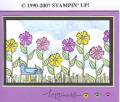
I had to play with a full card (as opposed to just a card front for swaps) to see how the ribbon would work with that before I could answer your question. I measured for the ribbon by using the grid from the Crafter's Tool Kit and marking every other 1/8" hole across the folded edge of the card. I punched these with a 1/8" punch. I threaded the narrow white organdy ribbon through these holes, securing it between the layers and wrapping towards the back to start it and ending from the back to between the layers on the other end. I secured it with mini glue dots. Then I did the same thing with the silver cord. I added small dots of adhesive between the layers and then scored the front of the card to open a little inside of the ribbon. If these were being used as an invitation or wedding card, I would have attached the inside insert at this point, so that it was sealed inside the fold.
On the front I used small dots of Crystal Effects where each hole was punched and placed a small pearl over each dot and let it dry to secure it. Hope this helps. - Kathy
------------------------------ Rediscovering the simple joy of stamping and exploring my art! Stamp your ART out! Share your thoughts. Let your heart sing.
Come check out my Gallery and leave a comment!
FS465