Registered: June 19, 2003 Location: Super Bowl City, TX Posts: 34508
Wed, Jan 05, 2005 @ 6:30 AM
This is absolutely amazing!!! I love these, although my wallet would not even fit!!! The stamping on this is wonderful and the whole purse is wonderful! TFS!
------------------------------
Jackie G. (aka Jacquita) SCSmember #656
Write your sorrows in sand and your blessings in stone.
Registered: August 4, 2004 Location: Illinois Posts: 776
Tue, Mar 08, 2005 @ 8:38 AM
sorry for the delay....
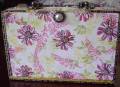
1. you will need to drill 2 holes in the cigar box so you have room to place the handle in, as well as 4 smaller-sized holes for the elastic cording and button attachment.
2. Use pencil to mark out the size of the cardstock, and cut to size. THIS IS IMPORTANT to do before stamping, to be sure your stamping gets the right density. Be sure to cut cs SLIGHTLY smaller than actual size to allow natural frame from the cigar box itself. If using an un-labeled box, cut as desired.
3. stamp as desired
4. Using contact cement, apply a THIN layer of cement to both the cardstock and the box. LET DRY UNTIL TACKY. This will create a permanent bond.
5. Stick stamped cs to box.
6. Using a pencil or other pointed object, poke through cs where your pre-drilled holes are located.
7. Attach handle, using a short screwdriver to tighten. If handle is loose due to a thin wood thickness, add washers to inside until you get a tight fit.
8. Put a bead onto the elastic cording to create an easy "grab" for the latch, and then feed ends through the pre-drilled holes. feed each end through another bead for added security, and tie ends into a tight knot.
9. Using another piece of elastic cord, attach button to box by tieing through remaining drilled holes.
10. If desired, use Crystal Effects to attach beads or other small items to front & sides only of purse to add extra detail.