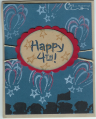
Here is my card from the stamp day in Arlington. It is a never ending card- you open from the middle and it folds out to a new view. This image shows the four views.
Date: Wednesday, May 2, 2007 GMT Views: 2791
Favorited:11
Registered: April 13, 2005 Location: Texas Posts: 65422
Wed, May 02, 2007 @ 6:38 PM
I'm very proud of my never-ending card!! This was a challenge at first, but now I know I could easily whip one out in 10 minutes!! Thanks for this unusual and clever card!!!
Registered: January 27, 2007 Location: Lawrenceburg, Indiana in winter and in Curtis, Michigan during summer months Posts: 50
Thu, May 03, 2007 @ 3:30 PM
Ok, would you be so kind as to send me instructions for this never ending card. I'd really appreciate it -- if you don't have instructions, could you let me know where I can go to find out the instructions? Love your card -- just gives me inspiration, but can't quite figure it out by looking. Ha!! Your fan, Sylvia Ruthven. My e-mail is [email protected] thank you soooo much. I am also known as Glitter Queen II, or the Hawk from Indiana
Registered: February 17, 2005 Location: Too far from the beach... Posts: 865
Fri, May 04, 2007 @ 4:46 PM
Hi Sylvia. Thank you for your kind words. Here are the directions. It is a simple assembly, but difficult to explain. Basically, you want to adhere only in the corners up to the crease. Each piece is 3 in. by 6 in.
1. Fold the short ends to the center on each piece. Crease well and unfold.
2. Place two pieces side by side vertically on work surface (darker side up).
3. Place the other two pieces horizontally on top of the first two pieces (darker side up). Make certain that all of the outside edges match as closely as possible. All four pieces should have the same design facing up.
4. Carefully adhere the common corners on all four corners using two small strips of double sided tape. Note: The corners include the space up to the creases made in step 2.
5. Open card and re-crease on all of the folds to make the card flip through each of the four pages. You will open from the center each time.
6. Construction of card is now complete. You may wish to round the corners. I think my time limit is up at this point. Decorate as desired, but be certain to plan the placement of the stamping before actually putting them in place, because the opening of the card reveals another area. Also, be sure to fold any pieces you glue on at scored areas. I placed my pieces in the center of the 2nd � 4th pages.
Registered: February 19, 2005 Location: Posts: 952
Sun, May 06, 2007 @ 2:32 PM
I loved the paper you chose for this card. It was really pretty. I only wish mine was as easy to open as yours. I'll have to keep working with it!
Thanks for the new fold!
Registered: July 14, 2005 Location: Texas Gulf Coast Posts: 680
Mon, May 07, 2007 @ 2:39 PM
I am sad to say I forgot to pick mine up at the end of the day. I will try it with your instructions. Hopefully Allee's and Buttercup will help me! I enjoyed stamping with you!