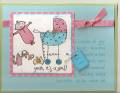
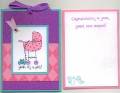
Here's the swap card I made for the Brides & Babies swap. It's a little narrower than a standard card--4 inches across instead of 4.25. You start with a regular half-sheet of cardstock and you score it 2" in on one side and 2.5" in on the other, then fold the sides together and adhere them with sticky strip. Punch a hole near the top of the card through the front and the back, and thread a ribbon through it. (I also punched a half circle at the top of the front of the card so you'd be able to grab the insert.) Put the insert in, pushing the ribbon down into the inside of the card as you go, and then tie a bow on top. The ribbon keeps the insert from falling out the bottom plus it looks kinda cute all tied up top. This does take a lot of ribbon--about 22 inches per card.
I colored in the baby carriage by doing reverse masking--I stamped the carriage on typing paper and cut out the inside of the carriage, then used a sponge dauber to sponge on color. I have problems watercoloring large areas like that and making them look good so I did this instead. The reverse mask worked like a charm, but if you're doing a bunch of cards you should make several masks. Once you've done a few cards the typing paper gets saturated and the color starts to bleed through where you don't want it (ask me how I know...) The dots are colored in with an Orchid Opulence marker, and the rest of it is watercolored with ink pad lids.
Date: Monday, March 26, 2007 GMT Views: 820
Favorited:6