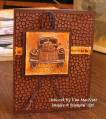
I needed to make a card for one of my hubby's work colleagues who generously loaned us his truck to pick up our new riding mower recently. So this is what I came up with.
Like a lot of stampers, I find it very challenging to do masculine cards. This one was doubly challenging as I chose to do it with the TCL108 coffee with cream challenge in mind: browns and creams and nothing else, and no coffee or chocolate themes. That's right, no black for me! Do you KNOW how hard that is? Well, I'll admit I did at one point use a teensy bit of black via a Micron pen to try to emphasize the truck feature a bit as I was having quite a time trying to bring it out. Unfortunately, the micro lines of black weren't a good addition. So I went over them with the Chocolate Chip marker, which did the trick. I should've tried that in the first place. You'll read more about this further down.
As you can see, I've incorporated the Canvas background stamp mixed with a Cuttlebug embossing folder again, this time stamping Canvas in Chocolate Chip on Close to Cocoa and then running it through the Cuttlebug using the Tiny Bubbles EF. And finally, rubbing the "Vintage Photo" Distress Ink pad (by Tim Holtz) over the Cuttlebugged part and sponging (I think! I'm a bit vague on the color I used here) the lightest color from the Kaleidacolor Cappuccino Delight rainbow pad in the holes. The look is pretty cool, I think.
I began the card by rubbing the same ink just mentioned (Vintage Photo) all over the biggest piece of cardstock (the main "card" portion). It looked awesome, like leather. It proved a bit challenging to glue the Cuttlebugged piece to the main card because the ink was so thick from all that rubbing, it affected the "stickability" of the adhesive. So I had to help things along by using Diamond Glaze (aka Crystal Effects) to adhere them. That took care of it.
The horizontal ribbon feature I used is from SU and comes in a cream color (what is that stuff, basting tape?) and I sponged the lightest color from Cappuccino Delight pad onto it and touched it up a bit with the next darker color on that pad (I was glad to find an excuse to use that pad). I stamped the "thanks" stamp from Amazing to Zany on it and used a 1/16" hole punch to make holes for the brads. I thought the brads kind of kept the circle theme of the Cuttlebugged part pretty nicely. I wanted the ribbon's edges to be a bit frayed to add more texture. I do love texture on a card. I also used Diamond Glaze to help the ribbon adhere. There was definitely a lot of trouble with adhering on this card. Diamond Glaze came to the rescue many times!
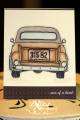
The truck feature was the hardest part to deal with and I'm not sure it'd be that easy to duplicate. I did so much layering of color to achieve the final look, it would be hard to describe. But I'll do my best:
The cardstock I worked with for the truck was vanilla. I stamped the truck twice: once for the base, and once for the cut-out part. I stamped them both first in the Vintage Photo ink, then danced the stamp in SU's Basic Brown ink and then stamped it on the vanilla and it gave the trucks a lovely mottled look. But once they dried, the images were kind of blah. So on the base piece, I sponged inks from the Cappuccino Delight pad to give the look lots of warmth, and then spritzed it with the Chocolate Chip and Close to Cocoa markers via my Inkworx air art gun to add a vintage-y look. Then I roughed up the edges with my scissors blade, scraping it across the edges and then sponged some more. I adhered that piece to a piece of Chocolate Chip cs which was well-rubbed with the Vintage Photo ink. I used Dimensionals, but they wouldn't stick. So I put some Diamond Glaze on the Dimensionals and they're good and stuck now.
Once the base was done I worked on the cut-out part. I cut it out and adhered it to the base with Dimensionals, and then I waterbrushed and sponged it with various browns (Close to Cocoa, Chocolate Chip, Basic Brown, Cappuccino Delight). Still blah. So I took the aforementioned black Micron pen and tried to very lightly doodle over the truck lines so it would stand out more. It did, but not in a good way. It added a bluish tone. So I doodled over that with the Chocolate Chip marker using both ends of the marker here and there, and that did the trick. Phew!
Once that was finished, I prepared the leather string by tying the ends in knots for more texture and looped and adhered it behind the truck feature. Then I adhered that whole thing to the Cuttlebugged part with Dimensionals and Diamond Glaze
Registered: September 29, 2005 Location: Ohio Posts: 1302
Mon, Mar 26, 2007 @ 10:54 AM
Thanks for all the details! This card is a perfect thank you for the loan of a pickup truck! I'm sure the person getting it was very pleased and impressed.
Registered: January 26, 2004 Location: Nampa, ID Posts: 7412
Mon, Mar 26, 2007 @ 11:10 AM
sos this is so crisp and elegant! great masculine card and that truck does pop! I love what you did with the cuttlebug folder - it looks so awesome!
~Kendra