Well, I'm a bit "early" this time! lol It's ONLY Tuesday. I am really happy with this card. Don't you just love it when your work gives you such pleasure?
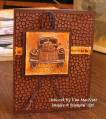
I did a little thinking outside the box on this one. Amy had the image feature as a square-ish rectangle and I decided to do a circle. I had been wanting to play with that Silly Sealife turtle for quite some time, so this was my chance to make him shine. Of course, I watercolored him! ;) I'm going crazy for watercoloring! Just love it!
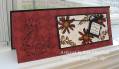
My bigger sentiment didn't quite reach the vertical element to the left as Amy's does, but otherwise, it stuck pretty close to the plan.
To create this card I cut Always Artichoke cs so that it opened from the bottom. I stamped the big and small circles from the Simply Circles set around the edges in VersaMark ink. Then I sponged Basic Black over that to give it a softer look.
I then cut a piece of Basic Grey designer paper from the Blitzen collection and ran it through the Cuttlebug using the Tiny Bubbles embossing folder. I made sure the printed side of the paper would receive the concaved (inward) imprint rather than convex (outward). Then I mounted it on black cs.
I cut the other elements going across and down and matted them with black cs. The one to the left I stamped in Basic Black using a Magenta mesh stamp. Then I sponged it in Basic Black ink. I then used a 1/16" hole punch and made holes for the brads. I then affixed the brads to the piece and mounted it using Dimensionals.
For the turtle element, I stamped on glossy white cs twice. I punched out one of the turtles with a 1&1/4" circle punch. Then I watercolored the other one using Baroque Burgundy, Always Artichoke, Old Olive, and Apricot Appeal markers, cut him out carefully, and mounted him directly over the other turtle with Dimensionals and trimmed off the part outside the circle. I had to cut a tiny piece of a Dimensional to hold up his widdle head.
Next, I mounted the turtle(s) on the black circle and cut a 1&1/4" circle out of another piece of black cs. Then I positioned the bigger circle punch over the smaller punched hole right where I wanted it (hold the punch upside down so you can see where you're cutting) and punched that out. Then I mounted it to match with the bottom black circle and made sure the smaller hole was lined up with the white circle/turtle image (hope that wasn't too confusing).
I stamped the "delight" image from the Paint Prints set in Basic Black on glossy white and sponged it with Baroque Burgundy, More Mustard, and Basic Black. I masked a stamp from the For the Love of Chocolate set for the words "in life" and stamped it on Always Artichoke. I punched it out using the smaller oval punch and sponged it with Basic Black. Adhered all that on and was finished!
Lots of work, but worth the effort, I think. Thanks for looking!
Date: Tuesday, March 13, 2007 GMT Views: 2012
Favorited:95
Ink: VersaMark, Basic Black, Baroque Burgundy, More Mustard; Markers: Always Artichoke, Baroque Burgundy, Old Olive, Apricot Appeal
Accessories: Cuttlebug Tiny Bubbles embossing folder, large circle punch, small (1&1/4") circle punch, small oval punch, 1/16" hole punch, Dimensionals, sponges, antique copper mini-brads