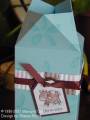
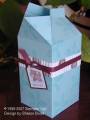
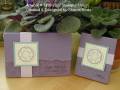
I've enjoyed seeing photos from Leadership. I attempted to figure out how they were made and gave one a try. Actually, I used a sealed envelope and cut it in 1/2 for the pockets (although I don't think that's what SU did). I'll be showcasing this project at upcoming workshops to entice more SAB bookings (they can Make & Take at their workshop).
DIRECTIONS & DIMENSIONS TO MAKE ARE: Score an entire 12x12 sheet (makes 2 photo wallets + 1 mini wallet) at 3 1/8, 6 1/4, 6 1/2, 9 3/4 and 10. The 1/4" score line are to create a bottom & top. Turn the sheet sideways and cut 2 strips 4 5/8" wide for the wallet (the left over 2 1/2 strip is for the MINI). Decorate the outside (you can also wheel it). For the belly band, cut 8 1/2" long x 1" or whatever width works with your design. Wrap it around the folded wallet (keep enough play in it to easily slide on & off--especially around the 1/4" top/bottom folds). Pockets were made by sealing 2 envelopes and cutting them in 1/2. Punch 1/2 of a large circle one the front of the envelope in the middle then decorate. Adhere envelopes using a sticky adhesive. Card inserts are 4" x 2 7/8" each with a hole punched for a brad centered in the half circle (decorate w/ a strip of designer paper so it shows thru the punched circle).
It's really a quick & easy project depending on how it's decorated--GREAT STAMP CAMP PROJECT or scrapbook Make & Take (which I'm going to try).
Thanks for looking!!!
Date: Wednesday, January 17, 2007 GMT Views: 3167
Favorited:133