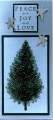
This tree was made entirely with the small tree stamp from Loads of Love, and took less than 2 minutes to stamp.
Here are the instructions: Starting at the top, stamp the tree down the center the entire length you want the completed tree to be. Then start filling in the "branches" near the top by angling the stamp up and out from the center, on both sides. When you get about 3/4 of the way down, clean your stamp, and inking ONLY the top part (foliage, not the trunk), start stamping the branches straight out, then tapering downward on both sides to shape the bottom. For a fuller tree, ink only the tip of the tree (top 1/3 or so) and continue stamping and shaping till you get the desired effect. For a thicker trunk, stamp the whole tree a couple more times at the base, overlapping slightly, then color it in brown. If you want to use a guide, you could lightly pencil in the shape before you start stamping, but be sure to stamp over the lines to cover (I didn't find this step necessary.)
This tree can be made as large and as full as you want by simply adding more and more branches and tips. I added Stickles to make the tree glisten (but the scanner didn't pick it up). Stars were punched from brushed silver and mounted with dimensionals.
Date: Friday, November 5, 2004 GMT Views: 1935
Favorited:23