Registered: February 26, 2004 Location: Colonial Heights, VA Posts: 1053
Sun, Dec 17, 2006 @ 10:45 AM
This one is very simple to do, but I'm not very good at writing instructions. Here goes nothing: Fold a sheet of 12 x 12 paper in half vertically, making sure to get the edges together and making a sharp crease. Then fold in half horizontally, doing the same thing. Now you have a sheet of paper that has been folded into fourths. Place the folded paper so the fold is at the right and all of the open edges are at the top. Pick up the bottom folded edge and fold the entire thing over so it's flush with the right edge. Turn the paper over and do the same thing with the back side.
As one who wastes a lot of supplies "trying" new folds, let me suggest making your first attempt on regular paper. This can be done with any size square of paper...
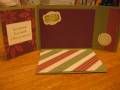
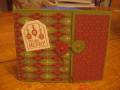
It's important not to use adhesive until you have folded the tops of the outside edges into whatever shapes you want. On the one above, I simply folded the left corner down on the left side of the book. Then placed adhesive (very thin strip of double sided tacky tape - you can get 1/8" from www.skybluepink.com) along the outer edge. On the right side, I cut the fold and folded the paper down, then whacked off a corner (which wound up being an embellishment at the bottom of the page). Then placed adhesive along the outer edge. This is all of the adhesive you need for this little book, other than placing embellishments, etc.
You can see that I cut along another fold and tore off a flap of the paper and attached it to the cardstock insert.
The remaining fold was where I just used the oval punch to punch out an opening at the top so you could see the cardstock insert.
Then you just cut some coordinating cardstock to fit inside the pockets. They can be used for photos, journaling, coupons, etc.
Clear as mud? If you need further instructions, email or pm me and I'll see what I can do. It's a fun little book and is quick and easy to make!