I designed this for a "anything but a card" workshop. As chance would have it, it fit a set of cards and envelopes beautifully. I gave it as a door prize at the next workshop.
Date: Tuesday, September 19, 2006 GMT Views: 374
Favorited:7
OMG!!! This is just beautiful - what a great idea! Can you give us a clue how to make the box and lid (dimensions or template) - anything to help me make one!
Registered: December 23, 2005 Location: California Baby! Posts: 648
Wed, Sep 20, 2006 @ 11:33 AM
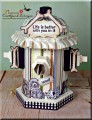
This box was created from a plain kraft or white box - actually, the technique can work with any box. Before beginning, measure around the box. This can be done with the box flattened. Add 1-2" to the measurement: This is the length of material you'll need for step 4.
1) Paint the box with your desired scrapbook paint. Or use white and mix your own custom colors from the SU! Re-Inkers. Let dry completely! I know everyone is anxious to complete the box, but you MUST let it dry completely or the stamped ink in the next step will run.
2) While the box is still flat, stamp any desired background, words, etc on the box. You can use either Craft or regular ink. Allow to dry completely.
3) Spray the box with either a matte or gloss sealer. Again, allow to dry completely.
4) Now using either wide decorative ribbon, Simply Scrappin' paper, SU decorative paper, or stamped cardstock, cut to the length determined before you started. There are several ways to adhere this to the box: a) Sticky Tape, b) Double-sided tape, c) Glue dots, or, my preferred method for ribbon, d) Mod Podge. If you use Mod Podge, use a paint brush or sponge and coat the entire length of the ribbon.
5) Starting at the back of the box, place the decorative strip around the flattened or formed box; overlap the ends when you've completed the wrap. Pinch the corners to make crisp corners in the decorative strip.