On the back of the frame, write the year and location of the picture going into the frame.
Take the wooden frame and cover it in light layer of Elmerâs glue (sides included).
With the glue wet, place the frame glue side down into the sand (a baking pan works well for this), and with you hands, cover the frame with sand everywhere the glue is. ALLOW TO DRY COMPLETELY!
Repeat the above step until the sand completely and evenly covers the frame (anywhere from 2-4 times, making sure each layer is dry before starting the next layer reduces how many times it needs to be repeated).
When the frame is 100% dry, organize the other mementos how you like on the frame (keeping in mind that the weight of some objects will be harder to stick on than others).
Once you love your frame, take some gorilla glue (or other heavy duty glue), gently glue the memento onto the frame and LET DRY! DO NOT LIFT FRAME UP UNTIL COMPLETE AND DRY AT TGIS POINT!
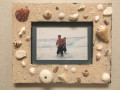
Once finished, grab your favorite picture from where you got the supplies for the frame, such as for this picture I was in Hawaii, so I collected a big bottle of sand, seashells, driftwood, and a few other random items I found on the beach and put them on my frame. (They donât have to all look pretty and perfect, shells can be broken etc, it just adds to the personality of the frame!)
An accent mat is optional but helps the frame and picture âpopâ that much more. I have frames with and without accent mats and I love them all.
Once again making sure EVERYTHING is dry (SO IMPORTANT), put your frame on display for everyone to see!
Date: Wednesday, January 3, 2024 GMT Views: 143
Favorited:0
Additional Info
Accessories: Wooden Frame (I use 5x7 and add an accent mat), Sand, seashells, driftwood, (other collectibles depending on location), multiple types of glue