You know how sometimes when you are cleaning up your workspace you find something that is perfect for a card you have had in mind and you have to make the card RIGHT NOW instead of cleaning up? That happened to me today. I was trying to tidy up one of the several workspaces scattered around the house that I have absolutely destroyed with clutter during my recent crafting binge.
(My wife has been out of town for two weeks so Iâve indulged myself but she is coming back tomorrow and will appreciate seeing surfaces of furniture)
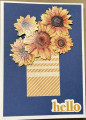
Anyway I had pulled a bunch of autumn themed pattern papers out of my stash, and was restocking them when this amazing piece of vintage collage style paper appeared in the midst of it. It was copyright 2003 so itâs been languishing for a whileânot just a vintage design but actually vintage paper, ha ha. It made me think of one of Lorettaâs cards that I had pinned during her Featured Stamper week in October and I realized it was perfect, so I had to make the card right then of course. Here is Lorettaâs card:
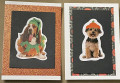
One of the Beautiful Shapes dies was perfect for cutting the two flapper ladiesâ heads out of the paper (I do regret losing the rest of their bodies but they were too big to fit on the card anyway). I found some dark pink paper scraps in my scrap box and used a scallop die to cut two of those. I ran the edges of the circles over my sepia ink pad to give some definition and glued them to the scallop circles.
I had a white premade card but it seemed to stark so I blended some tea dye distress ink around the edge that would show. I found some lovely peachy-pink cardstock in my stash and cut a rectangle from it, edged it with the sepia ink, and glued to the card front. I cut another section of the pattern paper to make the background and edged it with ink as well before attaching. I glued the two flapper lady circles in place. On a scrap of tan cardstock I stamped the honeycomb pattern stamp from the Butterfly Basics set, after stamping off the ink one time. Then I inked the sentiment and stamped it over the pattern without stamping off. I used a stitched label die to cut out the sentiment and inked the edges with the sepia ink before attaching to the card front. I stamped the Happy Birthday sentiment from the same set inside the card in the sepia ink. I looked through my fabric flowers but they were all too bright, so I instead attached a couple of small white and gold flower stickers from Dollar Tree around the sentiment piece. I love how this card turned out, and I appreciate Loretta for giving me the inspiration I needed to finally use these supplies.
Loretta, belated congratulations on your selection as Featured Stamper and I hope it was a fun week!
USEIT2023 - paper scraps but also FINALLY used a piece of pattern paper that had a 2003 copyright date.
Date: Saturday, November 4, 2023 GMT Views: 315
Favorited:0