I started by choosing the dp and cardstock. Die cut the circles and trimmed down. Adhered to the dp, along with the horizontal strips, and embossed the panel. Added the lace. Stamped Tilda, coloured her with copics and fussy cut. I have popped her up, using dimensionals, on the bottom strip. Stamped the sentiment and die cut the label.
TFL!
Date: Tuesday, May 24, 2022 GMT Views: 552
Favorited:2
Registered: July 9, 2008 Location: Stars Fell on Alabama Posts: 74740
Tue, May 24, 2022 @ 6:57 PM
Tilda is just darling and you've made such a wonderful birthday card.
------------------------------ My Blog---My Gallery---My PinterestI'm a Punchkateer! (Prez) FOREVERDirty Dozen Alumni2014 CAS Spring DT--- Inspiration Challenge Co- Hostess 12/02/17-12/28/19 Watercolor Wednesday Design Team Hebrews 13:2Brenda
Registered: November 7, 2009 Location: Sacramento Posts: 38941
Thu, May 26, 2022 @ 8:46 AM
Such a cute birthday card, Tilda is perfectly ready for a wonderful birthday party. I like that she is standing on the lowest horizontal element, that is perfect!


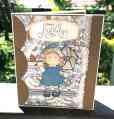


 I like your papers and the touch of lace.