I made this card as part of Create With Alyson ( https://www.facebook.com/groups/723887278295009/ ) challenge to use a technique from her member-only tutorial's from her "Acetate, Vellum, and Shaker Cards" suite of techniques. I chose her "Open Shaker Card" technique.
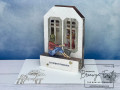
I started by die cutting a stitched rectangle window in the center of a 4"x 5-1/4" piece of heavy white cardstock, then used the next size up die to emboss a frame around it so it would look even more like a window. I then used strong double-sided tape to attach a clear acetate window behind the panel.
I next stamped the lady sitting in the window from Stampin' Up! (SU) "In the Moment" stamp set and tediously used an E-acto knife to cut out all the window panes (or should I say "pain"???). Then used paper snips to cut out the rest of the image. I colored her with Copic markers, then glued her so that the bottom of the image and the leftmost window frame was attached to the white panel.
Next I proceeded to create the shaker element. I used another 4"x 5-1/4" piece of heavy white cardstock and die cut the same window out of the center of it as I had the front panel. At the top and the bottom of this inside panel I put a strip of double -sided foam tape. Then I cut two strips of heavy white cardstock about 3-1/2" long and 1/2" wide. Using paper snips, I cut slits halfway through the strip like a comb, spaced 1/2" apart. Be careful not to cut through all the way. I attached these strips to the top and the bottom on top of the foam tape making sure that the "teeth" on the top strip opened to the top, and the "teeth" on the bottom strip opened to the bottom. These "teeth" were where I threaded fishing wire from top to bottom across the entire width of the strips while threading tiny blue seed beads along the length of each span. For best results, stagger how many beads are on each strand of fishing line... some just a few, other strands with a lot of beads.
I then put another layer of foam tape on top of the first, as well as two layers along the sides and mounted the front panel atop this "rain shaker" panel.
I probably could have done this with a bit less bulk if I had created the shaker portion directly on the front of the card base,,, but didn't think of it until I had the entire shaker front completed. So that meant I had to die cut another window in the card base front to match up with the window in the shaker panel. Before I glued the front onto the base so it aligned with the window I had cut in it, I used the same window die again and cut out a piece of SU's "Simply Marbelous" designer series paper and with the card closed, glued it into the inside of the card through the front opening so it would be perfectly aligned.
The final touch was to add a sentiment. I hot foiled it using aqua hot foil and a sentiment from Spellbinders' "Mini Sincere Sentiments" hot foil plates. Then punched it out, and attached to a punched mat using the same color cardstock as the card base.
I'm not going to lead you astray and say this card was easy, because it was challenging. Doing the tedious fussy cutting of the window panes and the lady was hard enough, but stringing eight strands of tiny seed beads took half-an-hour alone!
Lessons learned:
1. Be SURE and take any clear protective cover that might be on your acetate BEFORE attaching the sheet to your front panel (ask how I know!#$@).
2. After die cutting your front panel, put your second panel (or card front if you are going the less bulky route) in the whole and run through your die cutting machine to insure accurate alignment of the two window openings. Even if it doesn't cut thru the second layer, it will leave an impression that you can use to run just that second sheet thru the die cutting machine again to complete the cutting.
I am rating the difficulty level of this card as a "5" out of possible "5" due to the fussy cutting and bead threading. If you can find an image with a matching die that cuts out all the openings - go for it!!!
I like how the card turned out, and will definitely make another see-thru shaker card in the future. I think this card will be a good one to send a friend who is going through a rough time - be it medically or mentally.
Date: Sunday, May 1, 2022 GMT Views: 534
Favorited:5