I created an alcohol ink background on a 5x7" piece of Yupo. After the ink dried, I placed it into my MISTI, & positioned the snowflake stamps one one half of the panel to create a pattern. I stamped them with Alcohol Lift ink, then replaced the Yupo panel with a piece of white cardstock cut to the same size. I stamped the snowflakes onto that. I used a dry cloth to daub then buff off the residual lift ink from the Yupo paper. I rotated both panels & stamped the other half with the same stamp placement.
Unfortunately, the lift ink didn't work that well on the Yupo. I think maybe I had used too much alcohol ink in my background. At any rate the snowflakes didn't show up too well. So, to make lemonade out of lemons, I die cut the panel with my snowflake dies. Thankfully, the snowflakes on the white cardstock panel did show up well enough for that to be usable.
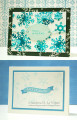
I cut the white cardstock panel to 3-1/2x5". I then trimmed one to 3-1/4x4-3/4". I matted that piece with blue cardstock, then added it to a white card base. I stamped my greeting (from "Color Layering Christmas Tree") onto a banner, & added it to my card.
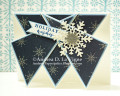
For my second card, I glued my die cut snowflakes to a white panel. I trimmed off the overhanging bits, and glued a couple of the larger ones to fill in gaps on the panel.
I die cut a tag, & stamped my greeting (from "Color Layering Snowflake") in Blu Raspberry ink. I punched a 1/16" hole in each end of the tag, & threaded through baker's twine. I added that to my panel with foam tape, & adhered the ends of the twine behind the panel. I added my snowflake panel to a piece of patterned paper from my scrap stash, then mounted that to a white card base. I always love a good two-fer!
Date: Monday, November 15, 2021 GMT Views: 469
Favorited:2