Sam Calcott at Mixed Up Craft had a herringbone tutorial on her blog & YouTube channel. I have done herringbone patterns before, but always had to think hard about what I was doing. Her tutorial really simplified things!
I have had the "Soak Up the Sun" pad for years. I don't have many sheets of it left, so I decided to use it up, if only to make room for another paper pad! ;) I thought it might be interesting to do a herringbone pattern with the various papers. I cut up the remaining papers (about 4 or 5 patterns) into strips of varying widths. I also cut a 4x5-1/4" panel of white cardstock, & covered it with an adhesive sheet. I removed the release paper to expose the adhesive, & started adding my strips. The background actually came together pretty easily. The hardest part was keeping from putting 2 strips of the same pattern too close to each other.
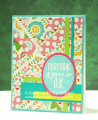
I heat embossed the greeting onto teal cardstock, & die cut it with an oval die. I used the next larger die to cut from magenta cardstock for a mat. I cut strips from lime green, yellow, & teal cardstocks, & arranged them on my background as per the sketch. I then adhered the matted greeting oval. I matted the panel with teal, and added it to a white card base. When I showed the card to my mom, she remarked how the greeting message kind of contrasts with the "chaotic" look of the background. I hadn't intended that, but I can see it now. I do like how this turned out, though. (So does my mom!) I will send this card to Send a Smile 4 Kids, hopefully to brighten the day of a hospitalized child.
Date: Monday, July 19, 2021 GMT Views: 170
Favorited:2