On 8 May 2021 at 17.00 (German time) the time had come: my virtual workshop on "3D Embossing Folders from Altenew", the Final Challenge Level 3 in the AECP (Altenew Educator Certification Program) began. I was sooooo excited....
The virtual workshop was a great challenge for me and I learned a lot preparing for it. There were many questions to be answered. What technology (camera, tripod) do I need for a virtual workshop? Which program will I use (ZOOM) and how does it work? What light source can I use, because my normal kitchen light flickers too much. I'm certainly not optimally equipped, but the start has been made.
I decided on the topic for the Final Challenge Workshop: Techniques with Altenew 3D Embossing Folders. For the workshop, I chose the "Bergenia 3D Embossing Folder" and the "Book Cover Engravings 3D Embossing Folder" from Altenew. For a virtual workshop, you can't provide and share the materials on site, so each participant must have the materials at home. Therefore, I promptly sent a supplies list to the participants. Here I would like to say a big thank you to Renate (Stempeloase) who placed the order with Altenew. I asked each participant if they wanted me to send paper, die cuts, etc. and each person who asked for something received it.
I changed the structure of the workshop several times. The more I prepared, the more ideas came up and the structure kept changing. One week before the workshop I decided on the final structure for the workshop. However, I had prepared way too much: two hours were not nearly enough to show and do everything.
I wanted to hold the workshop in English for Virginia and Erum, so they could understand me, which was another challenge. However, during the workshop Virginia told me that I could explain everything in German. As a result the workshop became a mixture of both languages.
Course of the workshop: 3D Embossing Folder by Altenew
After welcoming the participants, all of them stamping friends from the Münchener Stempelstammtisch, and after Virginia and Erum introduced themselves, I started by providing general hints about the embossing folders: The importance of the right "sandwich" in the die-cutting and embossing machine, what can be embossed (even toilet paper), how I managed to ruin an embossing folder....
In the first three parts of the workshop I showed different stand-alone techniques (see below), which we combined and expanded in part 4.
1. Application of color on the entire embossed paper.
- White or colored cardstock, craft paper, mirror cardstock....
- Swipe the ink pad (Altenew Dye Inks, or Distress Inks, Oxides, Altenew Pigment Gold Ink....) directly onto the dry embossed paper, or use a blending tool to apply the color
- Other options: wax, gold pastes, wipe-metal and then possibly Staz on afterwards.
2. Coloring the dry embossed motif using blending brushes
- Apply different ink pad colors with blending brushes on the embossed motif
- Attach various sentiment stamps from Altenew "criss-cross" to an acrylic block and stamp with black Versafine (or other) directly onto the dry embossed motif
3. Application of the ink pad color directly onto the embossing folder
- Apply an ink pad directly onto the flat side of the embossing folder with the indentations, but without rubbing ink into them. Place the paper inside the embossing folder and running everything through the Big Shot.
- Color only parts of the flat side with Distress Oxide and spray it with water and then place the paper inside the embossing folder
- Color the flat side with different ink pad colors, put the paper in and run it through the Big Shot. After unfolding the embossing folder, leave the paper in the exact same postion and ink the flat side with other colors to create wonderful effects.
4. Coloring and combining the previous techniques
- Use a background from technique 3 as base
- Combine all the coloring techniques from the previous parts
- Use make-up correction sticks or Mini Blending Brushes to color
- Color with other options: Polychromos pencils, watercolor pencils, Altenew Watercolor Brush Markers, brushes and watercolors
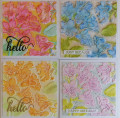
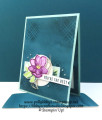
And of course I would like to show you the participantsâ artwork. Thank you to all participants: you were super and very active. THANK YOU!!!
It took me 2.5 years to complete the Altenew AECP training. I had a lot of fun while learning. If you want to do it yourself, you can read all the details on the Altenew website. And of course it is possible to book single classes at Altenew. There are a great variety of classes. Additionally, there are one-hour virtual workshops, if you prefer direct exchanges.
A big thank you to Virginia and Erum, who accompanied me throughout this time and thank you to all who supported me.
Best regards
Gabriele
Date: Saturday, May 15, 2021 GMT Views: 473
Favorited:3