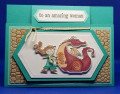
This card was made for two different card challenges. The first had a theme of "girlie things" and "embellishments". The second challenge was "girls just want to have fun".
I wanted to take a totally different turn than dresses or flowers, and chose what girls always dream of - being a princess who has her very own dragon!
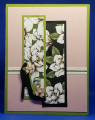
I found a really good tutorial on "mini flip flap cards" at Lisa's Stamp Studio
(https://lisasstampstudio.com/2021/04...rd-design.html ). I chose the landscape version, but she has pretty portrait examples as well!
I started by stamping my girl using two different stamps from the Stampin' Up! (SU) Magical Day stamp set. They don't have a girl princess, so I created one by stamping both the little boy knight and the mermaid. Instructions for how to combine the two into a princess can be found at Jane Almark's blog ( http://amethystarcrafting.blogspot.c...s-and-her.html ).
After coloring the images with Copic markers, I used the stamp set's matching dies to cut the dragon. I fussy cut the princess since she was two different stamped images that were combined to create her. In reality, I think you could die cut both the mermaid and knight and still modify them with scissors. That would have been a lot easier!
Following the tutorial for the flip flap card, I cut out my pieces using a paper trimmer and the nested stitched dies. The princess and dragon were mounted with foam tape for dimension.
I tried several pattern papers for the background on the inside of the flip piece, but decided to create a dragon-themed pattern using SU Crumb Cake cardstock that I ran thru my Big Shot by inking up the inside of the embossing folder with two shades of brown ink randomly. This gave the appearance of dragon skin!
After assembling the entire card I slipped a piece of wired gold-edged ribbon around the flip piece to match the princess's "belt".
The final step was to create the sentiment, which is from SU's "Happy Birthday Everyone" stamp set. I stamped on white cardstock, then die cut with the stitched dies. I felt it was too big, so used my paper trimmer to cut off the top and bottom edges. Of course, the dies were too large to create a mat for the sentiment, so I used a handy retired tool from SU called "tracing discs". SU doesn't make them anymore, but you can get them from leather crafting or quilting stores. Mine look a lot like these: https://am-leathercraft.com/products...brass-template
I am rating the difficulty level of this card as a "3" out of a possible "5". If your follow Lisa's tutorial, you can't go wrong!
Date: Saturday, April 24, 2021 GMT Views: 4066
Favorited:5
Additional Info
Stamps: SU Magical Day, Happy Birthday Everyone
Paper: SU Bermuda Bay, Coastal Cabana, Crumb Cake, Whisper White
Accessories: SU Magical Mates Dies, Stitched Nested Labels Dies, Hammered Metal 3D Embossing Folder, Tombow Multi Liquid Glue, Foam Strips, Michaels Celebrate It Wired Edge Ribbon, Paper Snips