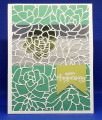
This card was made for a sketch challenge that also had the option to include a "see through" card technique.
I created my see through card by first cutting a card base from thick white cardstock that was 4-1/2"x 11", and folded it in half. The part that was going to be my card front was die cut using a beautiful Stampin' Up! (SU) die called "Potted Succulents". The result was a lacy silhouette of succulent plants linked together. I backed this lacy card front with two panels of SU Just Jade cardstock that were 4-1/2"x 1-1/2" and 4-1/2"x 2-7/16". Then I die cut a second lacy succulent panel from thick white cardstock and glued that to the back of the card front. This created a stiffer and more stable card front, and also made the card look nice when it was opened up.
Next, I used a die cutting trick that is perfect for paper piecing. I folded a non-perfumed dryer sheet so there was four layers, then put in my SU Pear Pizzazz cardstock that was just slightly larger than the succulent plant I wanted pieces for, the dryer sheet "sandwich" on top of that, then the die. I ran this through my Big Shot die cutting machine two times, then carefully removed the cut piece from the cutting plate. The result was that all my paper pieces were cut out, but stayed together on the dryer sheet so that I could pick them off with my Silhouette Pick-Me-Up tool as I need them. I closed the card, but a few dabs of glue in each lacy "hole" I wanted a piece of green to fit into, then inserted each piece into it. Be sure to use the flat side of your tool to press the piece down firmly as you open the card each time. This makes sure the green piece is glued to the inside of the card instead of to the lacy front. When I had filled in all the plant leaves I needed, I then die-cut a third white lacy piece, and using scissors, snipped the outline of the plant I had just pieced and glued it down inside the card on top of the green mosaic. This made the flower look MUCH nicer when the card is opened.
The final step was to create the banner element that was in the sketch. I used Versamark and an anniversary sentiment from the SU "Beautiful Bouquet" set. I then dusted with white detail embossing powder and heat set. I die cut the banner out of SU Pistachio Pudding" cardstock.
This card takes some patience and time to create it, so I am rating the difficulty level as a "4" out of a possible "5". I had at first tried putting Scor-Tape on the white cardstock so the back of the lacy piece would be sticky, but try as I may, I couldn't get the die to cut through the Scor-Tape backing. Maybe there is some other adhesive paper that would work, but Scor-Tape was all I had. Consequently, I had to put tiny dots of glue on the back of the intricate lacy piece for the front, then do the same thing to the FRONT of the lacy piece I glued inside. What a sticky mess!!! Thank goodness for my rubber glue-remover square!!!
Date: Thursday, April 15, 2021 GMT Views: 554
Favorited:2