Photo Details
|
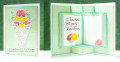
 | | A friend of my mom's got married recently. My mom asked me to make a wedding card for her & her new husband. Both of them are writers, so I wanted a card to go along with that idea. I perused Pinterest, & finally came across a Pop-Up Book card tutorial. Perfect! I also had pinned a card with the greeting I ended up using. I'm sure it was a stamp that that card maker used, but not having that (nor any idea who makes it), I designed my own version in Photoshop.
I began with my card base. The tutorial I saw was for an A2 size card, though I found the Splitcoast one that also had measurements for 6x6". I wanted a 5x7" card, however, so I cut a mock-up of the inside from copy paper to make sure the measurements would work. After I worked everything out with that piece, I cut my card inside from Ocean Breeze cardstock. Because I was adding this to a 5x7" card base, I figured I'd use a slightly lighter weight cardstock for the card base, to help reduce bulk a bit. So I used 100 lb. white cardstock for the outer base. I cut that to 10x7", & scored it in half at 5". Then I set that piece aside while I worked on the inside.
I found a piece of 12x12" patterned paper in my stash (so old, I don't know where it's from). I liked the subtle pattern & minty colors, so I used that for the layering pieces. There wasn't much contrast between that & the Ocean Breeze cardstock, though, so I inked the edges of the patterned paper panels with Evergreen Bough Distress ink before adhering them to the inside folded piece.
I stamped the flowers on white cardstock. I used Vanilla Cream, Dandelion, Sunflower, & Sunshine inks for the yellow flowers. The pink flowers are Bubble Gum, Guava, & Rhubarb Stalk. (If I had a 4th layer for a flower, I just double-stamped with Rhubarb Stalk.) The leaves use Soft Leaf, Sage Leaf, & Evergreen Bough Distress Oxide ink. After I stamped several flowers & leaves, I cut them out with the coordinating dies.
For the card front, I matted an inked piece of patterned paper with Ocean Breeze, & adhered it to the card base. I used my ATG adhesive to stick down a doily, and arranged my flowers & leaves coming out of the top. I used a piece of Press 'n Seal to hold the arrangement, & glued the pieces down one layer at a time. I needed stems to fill in behind the front flaps of the doily to give a look of greenery, so I used the stem image from "Buds & Vases." I stamped it 3 times on white cardstock with Evergreen Bough Distress Oxide ink, & blended regular Evergreen Bough Distress ink over them. I fussy cut them out. Because they were mostly covered by the doily, I didn't have to cut precisely. I glued those in place, & glued the doily flaps closed.
I created the greeting panel in Photoshop. I used a basic serif font for most of the words, and a fancier font for the "Love Story" & "Together" words, to help them stand out. I also did the fonts in 2 different colors to coordinate with the palette I had going with the card.
There was space below the greeting on that panel, so I stamped more roses & leaves, masking as I went, to keep it one-layer. I also had a stamped/die cut rose left over from the card front, so I glued it to the bottom right corner of the panel for the personal message. Then I cut off the excess of that. Waste not, want not! 
I used strong double-sided tape to adhere the inside to the card base. I first lined up the right side of the inside panel, & adhered it in place. I peeled off the liner papers for the adhesive on the other side, & folded the card closed. Unfortunately, the inside panel adhered crookedly. :( I have a bottle of UnDu adhesive remover for just such an occasion, though, so I applied that, peeled the inside from the card base, let the UnDu dry, and re-adhered the inside. Problem solved! (That's one reason I don't care for glue for such things, since once that sets up & dries, it's permanent.)
I considered adding a congratulations greeting strip or something to the front, but decided to leave things as they were. The inside is the real show, anyway! |
|
Date: Wednesday, April 14, 2021 GMT
Views: 1593
Favorited: 3
|
|
Additional Info
|
|
Keywords: wedding love
|
|
Stamps: Altenew "Vintage Roses"; Gina K "Buds & Vases"
|
|
Paper: Bazzill Ocean Breeze cardstock; white, mint, blue
|
|
Paper Size: 5x7"
|
|
Ink: Hero Arts Soft Leaf, Bubble Gum; Lawn Fawn Sage Leaf, Sunflower, Guava; Evergreen Bough Distress Oxide & regular Distress ink; Altenew Vanilla Cream; Memento Dandelion, Rhubarb Stalk
|
|
Accessories: Altenew "Vintage Roses" coordinating dies; Computer with Photoshop & printer
|
|
|
|
Difficulty (1-Easy 5-Advanced): 3
|
|