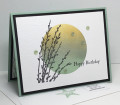
Using the negative circle mask I used Blending Brushes to add color to the opening while my mask layer and card layer were taped securely to my silicon sheet. You want a very crisp edge to your masked image so be sure the layers will not shift as you add color.
Once your masked area is completed, remove the tape and then stamp your silhouette image where you want it. This is one of the easiest techniques and always so satisfying when completed.
TFL
Date: Monday, April 12, 2021 GMT Views: 1653
Favorited:0
Splitcoast Dirty Dozen Creative Crew SU Design Team Alumni
Registered: May 18, 2004 Location: Southwest Michigan Posts: 37113
Mon, Apr 12, 2021 @ 1:19 PM
This IS a lovely technique; I should think of it more often! I love the soft colors you blended; they make such a perfect backdrop for that pretty silhouette.
------------------------------ Claudia Splitcoast Fan Club Member
Registered: August 21, 2007 Location: Wayland MA Posts: 105272
Mon, Apr 12, 2021 @ 1:23 PM
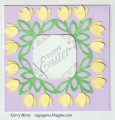
What a perfectly beautiful creation!!!
------------------------------ Anne HarmonFS154, QFTD58, PROUD FAN CLUB MEMBER (photo of our Great Granddaughter Elise, just 6 months old) and me, even older.
Splitcoast Dirty Dozen Creative Crew SU Design Team Alumni
Registered: January 7, 2007 Location: Southern California Posts: 42913
Mon, Apr 12, 2021 @ 3:36 PM
Gosh this is gorgeous!! I love to see a beautifully colored reverse mask like yours. It's perfect for the ***** willow stems. Now I may need to buy that stamp.
------------------------------ Kathy Stamp n Sip with me