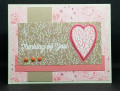
This card was made as an inspiration card for a challenge that required the use multiple-layers and include lace in the design.
I had seen a card I liked on Pinterest by Susie Wood (https://stampwithsusie.blogspot.com/...delicate.html). I liked her design, so turned it horizontal to accommodate my dandelion stamp width. Used different papers, measurements, stamps and dies.
The "card base" is 2"x11" black cardstock scored and folded in half. Inside the base I attached a full-size 4-1/4"x 5-1/2" black panel. On this panel I used Versamark ink to stamp the pretty lace strip from Stampin' Up! (SU) "Delicate Details" set and then dusted with white embossing powder and heat set. It was stamped so it was right above the front of the card so it would show when the card was closed.
Above the lace image, I glued a 5-1/4"x 1-1/2" white panel after stamping dandelion seeds randomly all over it. Below the lace is a white panel 1-3/4"x 5-1/4" behind the front card cover so that it didn't show when the card is closed. This is for your personal message.
The front of the card was created using SU "Magnolia Lane" designer series paper (DSP).
The dandelion panel is white cardstock measuring 4"x 2-1/2" on which I stamped the dandelion with its seeds blowing off to the right. I doubled matted this with SU Mossy Meadow and Basic Black cardstock. It was glued onto the narrow front of the card on just the lower half of the matted image.
Finally, the sentiment is from SU "Thoughts & Prayers". The stamp itself says "Thinking of You... Please know that I care", but I cut the stamp in half so that just the top two lines could be stamped on my cardstock. It was die cut using the nested labels die, and matted with black. I didn't bother putting any foam behind the bottom half of the sentiment piece,,, I just glued the top half to the dandelion panel.
I am rating the difficulty level for this card as a "2" out of a possible "5" because of all the time it took to figure out the sizes of all the panels (I didn't use Susie's measurements), in addition to all the layering and heat embossing. It took about 2 hours from start to finish. No individual step was hard if you already have the measurements!
Date: Sunday, January 17, 2021 GMT Views: 1373
Favorited:4