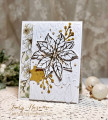
I had made the green leaves on this card for another poinsettia card--and then forgot to glue them on until after I'd glued the red bracts & the glue had dried! But, I kept them, determined to make another card with them. I finally created the opportunity with this card.
I die cut the poinsettia pieces from watercolor paper, and used the ink smooshing technique to color them with Victorian Velvet Distress ink. I also die cut the same pieces--in addition to the leaf pieces--from plain white cardstock, since I figured the back of the flower would show in the final design. I glued the white cardstock pieces to the back of my ink smooshed pieces, then inked the back of each piece with Distress Oxides in Victorian Velvet & Mowed Lawn, just to blend the color in a bit more. I glued the flower pieces together, adding glue just in the center of each & layering them, finishing with a gold glitter center.
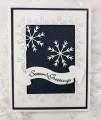
I used Distress Oxide inks & the "Winter Floral Layering" stencils to create the "patterned paper" for my card front. I chose Oxides since I wanted a pale blue background, & figured they'd cover better than the regular Distress inks.
I heat embossed my greeting onto a strip of vellum, then machine-stitched it to my stenciled panel with gold metallic thread. While I ran it through the machine for the first side, I had the other side taped in place, to keep the strip from shifting.
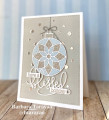
I die cut 2 circles from vellum to hold my poinsettia. I originally tried a gold shimmer cardstock, but it covered up way too much of my stenciled panel. I ran both of the circles through my Creative Station 550, to add a solid layer of adhesive to the back of each. Then I stuck one onto the other one, leaving the second on the release paper. I used 2 layers mainly to make it more sturdy, as it would stick up above my card base.
I ended up having to die cut yet another vellum circle. I had adhesive on the back of my now-layered circle, so I could stick it to the card front panel. Since it would stick above the panel, I needed something on the back to cover the adhesive. So I ran the third circle through my Xyron, and adhered it to the back of my layered vellum circle, sandwiching the stenciled panel in between. Finally, I glued my flower & leaves in place. I adhered the stenciled panel to a 4-1/4" square card base. The vellum circle sticks up enough to make it 5-1/2" tall total.
Date: Friday, January 8, 2021 GMT Views: 298
Favorited:2
Accessories: Poppystamps "Blooming Poinsettia" die set; Simon Says Stamp "Winter Floral Layering Set" stencils; We R Memory Keepers "Nested Circles" die; Ranger Gold Super Fine Detail embossing powder; Sewing machine; Xyron Creative Station 550
Registered: June 29, 2004 Location: Sugar Land. Texas Posts: 79790
Fri, Jan 08, 2021 @ 5:27 PM
Love the splattered paper you made for the poinsettia! Gorgeous card.
------------------------------ LizThe joy of the LORD is my strength.Right Brain Madness --My blogProud member of the redDivasKSS certified multi-step stamperFan Club member since 2004