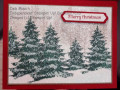
You'll also need a 2x6 inch strip of cardstock for a mask, any color. Carefully tear along one long edge to form hills and valleys, don't tear too deep, you need something to hold onto while you stamp. Set aside for now. To get this effect, do all your stamping first. On the large white panel, lightly sponge in Balmy Blue for the sky and snow ground, leaving light and darker areas of blue and white showing. Ink up the stand of trees in Gray Granite, stamp off onto your worksheet to remove some of the ink, then stamp in place across the sponged panel, to get a softer image. Then ink up the large evergreen in Shaded Spruce. You'll stamp this several times using the torn mask. Move the mask at different angles and stamp the evergreen tree at different heights -- this gives the illusion of large and small evergreen in a snowbank. use the Spruce ink full strength, ink up the evergreen every time. Cut a piece of adhesive sheet material the same size as the stamped panel. Peel off the top backing sheet, place carefully directly onto your stamped panel front. Burnish to get out any air bubbles and make good contact with the adhesive. Carefully and slowly peel back the remaining backing sheet leaving a very sticky surface on top of your stamping. If you've missed a spot, or touched the sticky and removed some by mistake, rub a little glue onto the spots. Shake fine clear/white glitter all across the surface, then rub gently to distribute evenly. Dust off extra glitter and mount the glittered trees onto the cardstock layers as shown.
Date: Tuesday, November 10, 2020 GMT Views: 1172
Favorited:8